DentalPlus+ . The Clinical Guide…
¶ Patient Journey
When a patient arrives at the practice, the receptionist will book them into the Waiting room. When booked, they will appear in the Waiting Room section of the toolbar. Changing the status to 'In Clinic' moves the patient to the 'In Clinic' sector, indicating that the patient is in a surgery. Each practitioner will see only their own patients in this area.

To view the Patient Record, double-click the name in the 'In Clinic' area, search the name or double-click the appointment in the Appointment book.
¶ Medical History
¶ Patients with medical alerts...
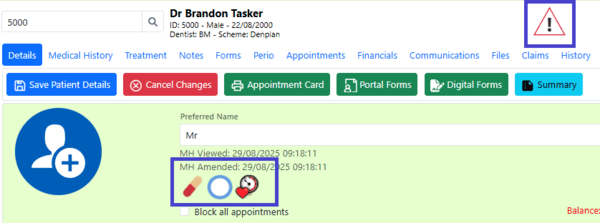
Important medical alerts are displayed as icons on the patient record details page. A warning symbol will also appear in the toolbar whenever you are viewing a patient with a medical alert.
¶ Viewing Medical History …
¶ → Current medical history form
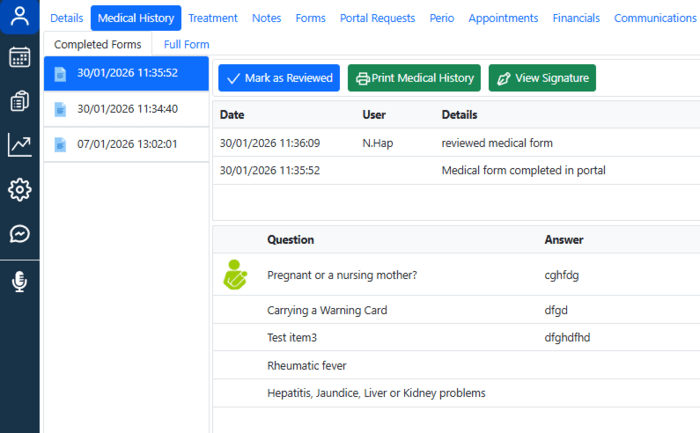
- Open the Patient Record and go to the Medical History section.
- In the Completed Forms tab, all questions answered “Yes” will be displayed.
- View a patient's signature if necessary, or print the completed Medical history form
- Click the ‘Full Form’ tab to display all medical questions
¶ →Previous medical history forms
- Open the Patient Record and go to the Medical History section.
- Select the required form from the left-hand pane.
- The system will display all questions that are answered "Yes" as well as the patient's signature, if it has already been signed.
- Click “Print Medical History” to generate a PDF file with all answers.
¶ Reviewing the Current Medical History
- Open the Patient Record and go to the Medical History section.
- The Medical Answers page will automatically load with all current answers.
- Once you have reviewed the MH, click the “Mark as reviewed” button, and this will be recorded in the system.
¶ Printing a Blank Medical History Form
1. Open the Patient Record and go to the Medical History section.
2. Click ‘Print blank’ or ‘Print with no answers’
¶ Treatments and Charting

¶ Starting a New Treatment Plan
- Open the Patient Record and navigate to the Treatment section.
- Click New Plan in the top left toolbar.
- A new treatment plan will be created and ready to use.
¶ Loading a Previous Treatment Plan
- Open the Patient Record and navigate to the Treatment section.
- Click the Load button in the toolbar.
- A pop-up window will display all past treatment plans.
- Double-click the desired plan to open it.
¶ Recording observations in the Base chart
The purpose is to establish a comprehensive record of a patient's oral health at the start of care.
1. Open the Patient Record and navigate to the Treatment section.
2. Click the ‘Observations’ tab in the top left area.
3. To configure the teeth view, follow Actions→ Tooth View and select Permanent, Deciduous or All.
3. To add an observation item, select the item from the list:
- For a surface item, the selected surfaces will be highlighted in green.
- For a tooth item, the entire tooth will be highlighted.
- Multiple-tooth treatments will remain on hold until all relevant teeth have been selected.
Alternatively, you can hover the mouse pointer over the teeth on the chart, choose the relevant surfaces or teeth, and right-click to select the required base item.
3. Click ‘Save’ to chart the item and record it in the ‘Base’ tab
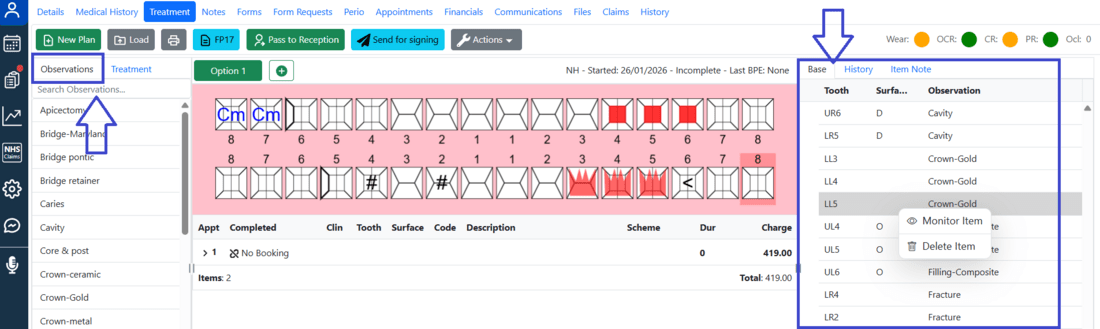
The Base tab shows a list of all base items.
To monitor a base item and add a note:
1. In the “Base” tab, right-click on the required observation.
2. Choose “Monitor item”
3. An arrow will appear next to the item, and an ‘eye’-icon next to the tooth number on the chart
4. Expand it and double-click to edit a note
5. Enter a note and click ‘Save’
To remove the base item:
1. In the “Base” tab, right-click on the required observation.
2. Select the 'Delete' option.
¶ Adding items to a treatment plan
- Open the Patient Record and navigate to the Treatment section.
- Click ‘New Plan’ or ‘Load’ the existing one in the toolbar.
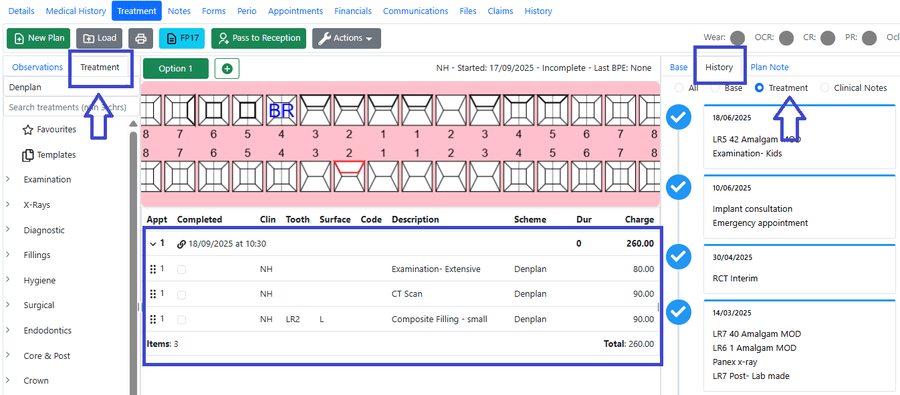
- Select the ‘Treatments’ tab in the top left area.
- Add treatment items via the list of treatments or the chart.
From the list of treatments:
- For a surface item, the selected surfaces will be highlighted in green.
- For a tooth item, the entire tooth will be highlighted.
- Multiple-tooth treatments will remain on hold until all relevant teeth have been selected.
From the chart:
Hover the mouse pointer over the teeth on the chart, choose the relevant surfaces or teeth, and right-click to select the required base item.
5. Click Save, and the items will be recorded in the chart and in the treatment plan
6. Click on the top row to expand the list of treatments
Each treatment plan opens separately, and completed treatments can be found in the History tab→Treatment
¶ Editing treatment details
- In the treatment plan, single-click on the treatment you want to edit.
- The details will expand, allowing for updating the price, discount, completion date, description, tooth and surfaces, and duration.
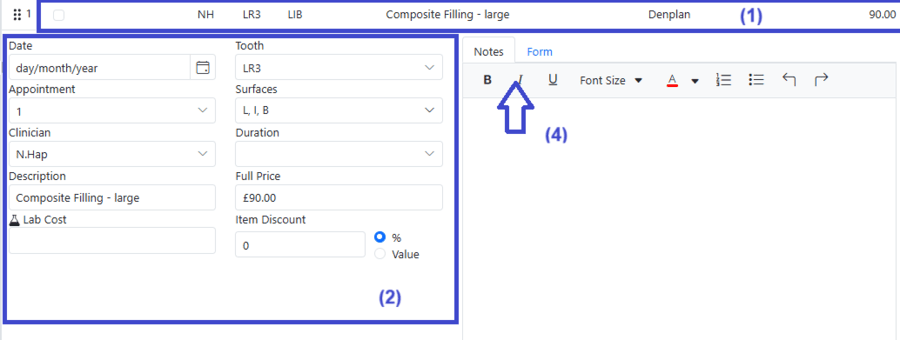
3. Any changes made are saved automatically.
4. Use the Notes and Forms tab to record treatment notes and submit specific treatment forms.
Drag and drop items within the current treatment plan if necessary.
¶ Viewing the tooth history
- Double-click the tooth number in the chart.
- In the pop-up window, open the “Tooth History” tab.
- A full list of all activities related to that tooth will be displayed.
¶ Printing a Treatment Plan
- Click the “Print” button in the top left toolbar.
- In the pop-up window, select the information to include and add any comments.
- Click Print.
- A Treatment Plan will open externally
- Use the toolbar to print, email or sign it.
¶ Signing a Treatment Plan
The treatment plan can be signed electronically by patients. Click ‘Send for signing’ to create a portal request, which is sent to the patient. Once signed, it is automatically stored under the relevant course of treatment in the Patient Record.
¶ Linking appointments to treatments
The system allows you to link booked appointments to planned treatments, enabling more accurate financial planning for the practice. This can be done:
From the Patient Record → Treatment
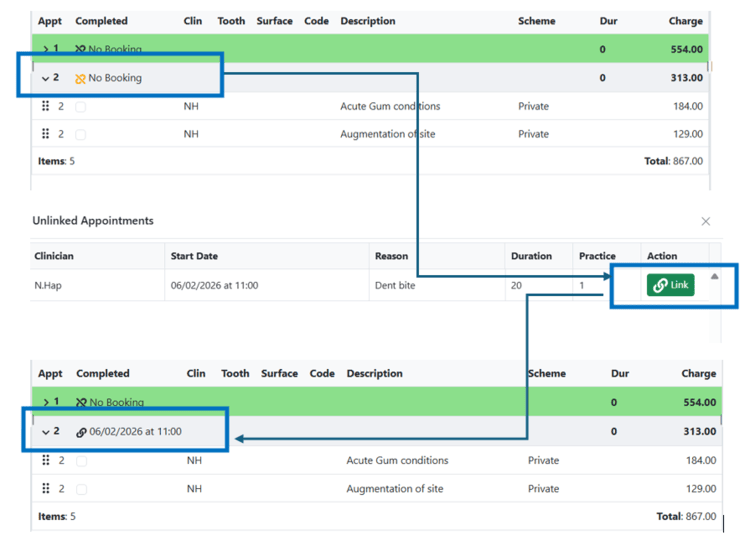
- Click the Link icon next to No Booking.
- Select the corresponding booked appointment.
- The details of the future appointment will then appear in the Treatment Plan.
From the Patient Record → Appointments
- Click the Link icon next to the Appointment history.
- Select the treatment appointment and click Link
You can undo the linking by clicking on the icon again.
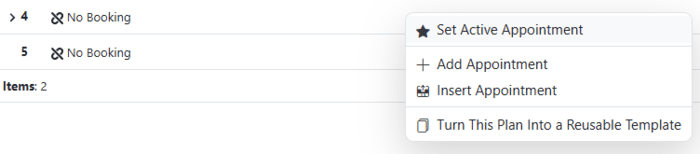
¶ Multiple appointments for a course of treatment
Adding multiple appointments for a course of treatment allows dividing a plan into manageable sessions that can be directly linked to scheduled appointments.
1. Open an existing plan or start a new treatment course
2. Right-click on the top row (next to No Booking).

2. Select Add Appointment.
3. A second appointment will appear. Repeat these steps to add more appointments
4. Add all treatments required to the plan.
By default, they will be shown at the most recently added appointment. To add them to a specific appointment, right-click on the top row (next to 'No Booking') and select 'Set as Active'.
How to drag and drop the required treatments into another appointment:
- Click the arrow next to ‘No Booking’ to expand the list of all treatments allocated to this appointment

2. Move the mouse pointer to the area with six dots and hold the left mouse button
3. Drag and drop the required treatments into another appointment:
The system adds new appointments to the end of the list and also allows to insert an appoitment between two existing ones
¶ Multiple treatment plan options
Practitioners use multiple treatment plan options to give patients clear choices that suit different needs, budgets, or timelines. This helps patients make informed decisions and feel more involved in their care.
- In the Treatment section, click the ‘+’ button
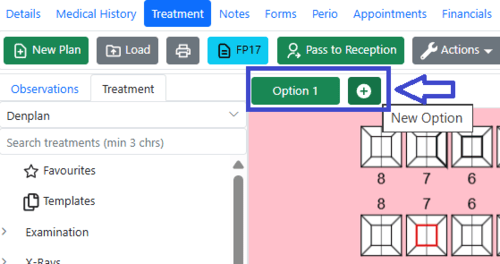
2. A pop-up will appear, offering to duplicate the current plan or create a new one.
3. Add treatments into the new plan as normal
When a patient approves a plan and treatment begins, the alternative treatment option becomes locked, so treatment cannot begin on the plan that was not consented to.
¶ Loading Imaging Systems
- Click the Imaging System icon on the toolbar.
- If your practice uses a single imaging software, it will automatically open and display the images for the patient currently selected in DentalPlus.
- If multiple imaging programs are configured, a pop-up window will appear. Select the desired software from the list to open it.
¶ Completing a course of treatments
- When a treatment is finished, tick the “Completed” checkbox next to each treatment in the treatment plan.
- The Completed Date will automatically appear in the corresponding column. To modify this date, click the treatment description and update it in the Item Details.
- Some items in a treatment plan can remain incomplete if necessary. To mark the entire plan as complete, go to Actions → Set Plan Status → Complete.
If a treatment has already been invoiced and you need to change the completion date, first delete the invoice from the patient’s Financial section. Once the invoice is removed, the treatment item will be available for amendment.
¶ Pass to Reception and invoicing
The “Pass to Reception” option sends instructions to the reception team, outlining the actions required once the patient’s treatment in surgery is complete.
In the Patient Record → Treatment section, click “Pass to Reception” on the top toolbar.
Step 1: Patient Charge – Review the invoice details, then save or print as required.
Step 2: Update Recalls – Check and confirm the recall timeframe. This is important for staying in touch with patients who do not have future appointments.
Step 3: Pass to Reception – Add details for the next appointment. And send the ‘Pass to Reception’ task.
Each step can be skipped if necessary
¶ Submitting a Claim to the NHS Batch
- Click the “FP17” button in the top left toolbar.
- In the pop-up window, review and enter all required details. Change a tab for orthodontics claims.
- Check the date, performer and contract details
- Once complete, click Submit.
The claim will be added to the NHS Claims batch, ready to be sent.
Claims related to the current patient can be found in the Claims section of the Patient Record
¶ Clinical Notes
¶ How to add a Clinical Note…
1. Open the Patient Record and navigate to the Notes section.
2. Click ‘New Note’
3. To enter a freehand note:
- Type your note in the editor, using the toolbar to format the text if needed.
- Click ‘Save Note’.
4. To use a preset note template:
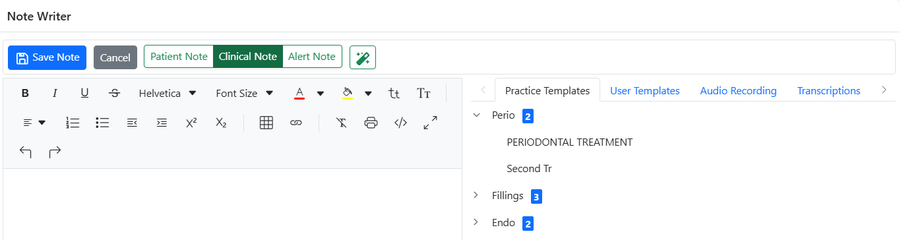
- Choose the type of note templates: Practice or User templates.
- Select a template from the list.
- Left-click the desired template to insert it into the note.
- Add any required information and click ‘Save’.
By default, all new notes are created as Clinical Notes. When entering a Patient Note or an Alert Note, the appropriate note type should be selected in the toolbar before saving.
¶ How to edit a Clinical Note…
1. Open the Patient Record and navigate to the Notes section.
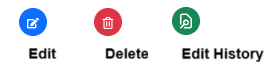
2. Click the ‘Edit’ icon in the note's toolbar
3. Make the required changes and click ‘Save’.
4. Notes are always available for editing by the user who created them. Click ‘Edit History’ to view previous versions.
Editing, deleting, and viewing a note’s edit history are permitted only for the user who originally created the note..
¶ How to delete a Clinical Note…
- Open the Patient Record and navigate to the Notes section.
- Find the necessary note
- Click the ‘Delete’ icon in the note's toolbar and confirm the action.
Deleted notes can be displayed by selecting the ‘Show Deleted Notes’ checkbox.
¶ How to print Clinical Notes…
- Open the Patient Record and navigate to the Notes section.
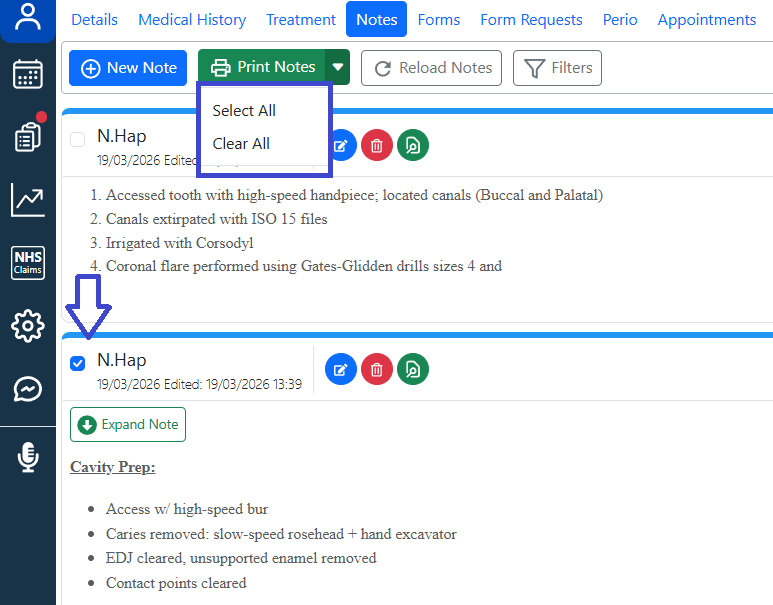
- To print all notes, click the arrow next to the 'Print Notes' button
- To print an individual note, click the tick-box next to each note
- Press 'Print Notes': a PDF file will be generated in the default browser, ready for downloading, printing, or emailing.
¶ Clinical note Templates…
Two types of preset note templates are available in the system.
- Practice Templates. They are shared templates accessible to all users within the practice. Location: Admin → Practice Setup → Practice Clinical Notes
- User Templates. Individual users create them and use. Location: Admin → User Setup → My Clinical Note Templates
¶ → How to manage Clinical Note categories…
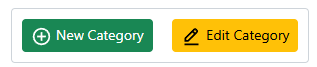
Adding a new Category:
1. Click ‘New Category’
2. Enter a name and click ‘Save’
Editing a Category:
- Select a category
- Click ‘Edit Category’
- Change the name and save changes
Deleting a Category:
- Select a category
- Click ‘Edit Category’
- Press ‘Delete’
Before deleting a category, make sure all notes associated with it are removed.
¶ → How to manage Clinical Note templates…
Adding a new template:
- Click ‘+New’
- Enter the note name and confirm the category.
- Create the note template by typing freehand, pasting text, or using an existing preset template.
- Save a note template
Editing a template:
- Click the arrow next to the category to expandthe list.
- Select a template you want to edit.
- Make your changes and click Save.
Deleting a template:
- Click the arrow next to the category to expand the list.
- Select a template you want to delete.
- Click ‘Delete’.
Deleting a template will not affect previously saved notes.
¶ Forms
These three modules — Forms, Form Requests, and Patient Portal — form the foundation of the digital patient workflow. Together, they reduce paperwork and improve document tracking throughout the patient journey.
- The system is designed to create, send, and store a wide range of consent and medical forms.
- Form templates are configured in the Admin section.
- Once created, they can be sent to patients from Patient Record → Form Requests
- Forms can be completed online via the Patient Portal or using a tablet.
- All completed forms are automatically stored in the Forms section of the Patient Record for easy access and review.
¶ Overview: from request to review
- The user selects the required form and sends a request via Patient Record → Form Requests → Send New Request.
- The patient receives it by sms or email
- The patient completes the form online through the Patient Portal before their appointment.
- Once submitted, the completed form automatically appears in Patient Record → Forms, under the appropriate folder.
- The user can open the form from the list to review its contents.
- If a form requires clinician review, the system highlights it to draw attention and ensure appropriate follow-up.
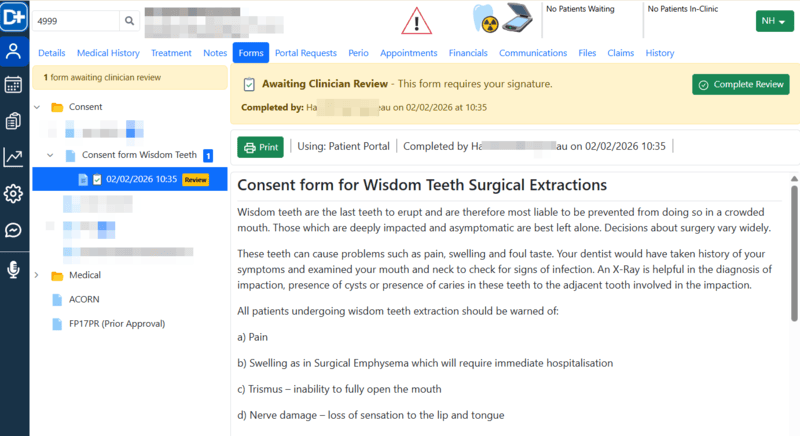
5. Once the form is reviewed and signed by a clinician, the system locks the form and marks it as Reviewed. This applies only to forms that include signatures.

These steps improve efficiency, enhance patient satisfaction, and support effective practice management—helping your practice move towards a fully paperless workflow.
¶ How to manage patient forms
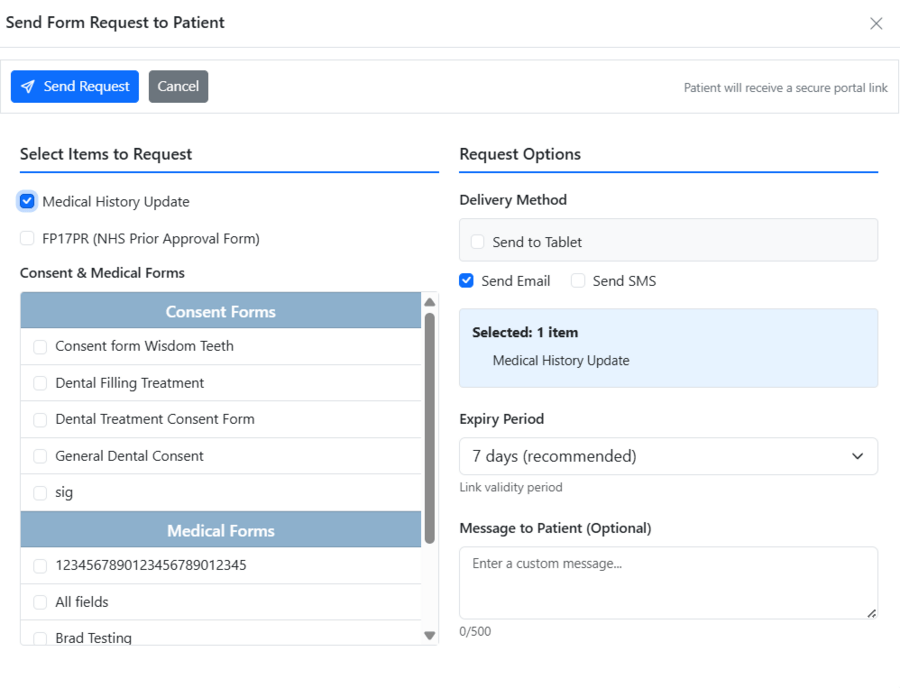
¶ How to send a medical form for completion
- Open the Patient Record and navigate to the Form Requests section.
- Click Send New Request.
- Select one or more forms from the list.
- Set the expiry period for how long the web link will remain valid.
- Add a message and choose the notification method.
- Choose a delivery method: email, sms, tablet
- Click Send Request.
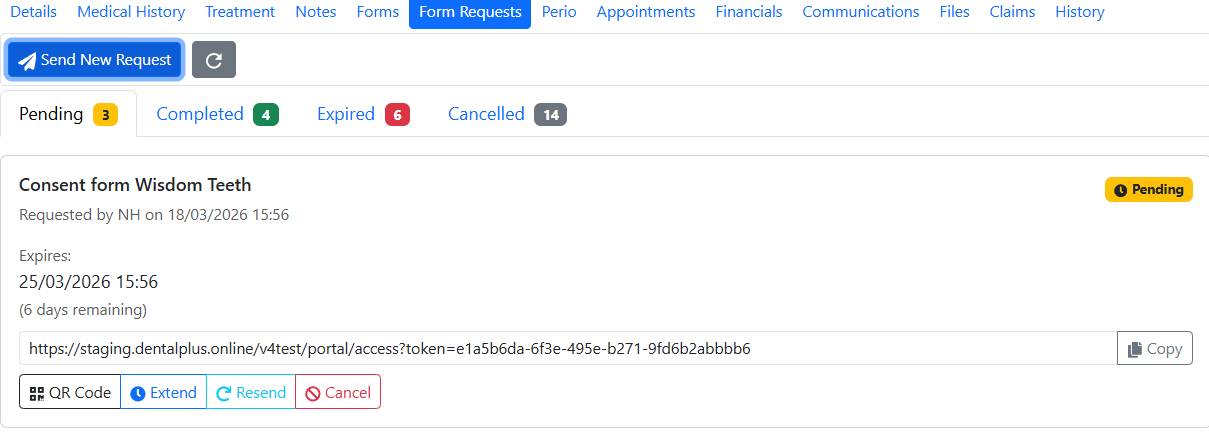
8. The status of each request can be checked in the Portal Requests dashboard under the ‘Pending’ tab. From there, users can resend requests if necessary, cancel or extend them, or display a QR code for signing on the tablet.
9. The patient receives the request and completes the form.
10. Once completed, the forms appear in the Patient Record → Forms section under the relevant folder.
¶ Queue forms for Portal
Often, the practice needs to enter specific treatment details (e.g., tooth number, surgical complexity) before sending a consent form to the patient. The Queue for Portal option serves as the starting point for this workflow. It also allows sending a single Form Request with multiple forms at once.
How to use it:
- In the Forms section, click the name of the form you want to start.
- Enter any required details.
- Click ‘Queue for signing’.
- The system keeps the form in the background in case additional forms need to be sent.
¶ How to find a completed form
- Open the Patient Record and navigate to the Forms section.
- In the left-hand panel, expand the list of forms by clicking the arrow next to the relevant folder.
- Select the required form from the list.
- The form will open and display on the screen.
- some forms would be opened for editing
- other forms may be locked, e.g., medical forms containing signatures.
- forms that require clinician review are highlighted to indicate that review is needed.
¶ How to print a form

- Go to the Patient Record → Forms.
- Open the required form.
- Click Print.
¶ How to edit a form
- Go to the Patient Record → Forms.
- Open the required form.
- Make changes in the open form
- Click Save Form.
¶ How to delete a form
- Go to the Patient Record → Forms.
- Open the required form.
- Click Delete Form.
Forms can only be deleted if they are unlocked.
¶ How to manage form templates
Open the Admin section and navigate to the Documents, Forms and Templates section. Click Form templates.
¶ How to add a form template
- Click + New.
- Enter a form name.
- Choose a Category and a Language.
- Click the + button and select the widget you want to add. (1)
- Once the widget appears on the screen, click on it to adjust settings or add necessary text. (2)
- Add mail merge fields to display the actual patient data in the form. (3)
- Repeat steps 4–6 until the template is complete.
- Click Save.
- The new form template will then appear in the list on the left-hand panel.

¶ How to edit a form template
- Open the Admin section and go to Documents, Forms and Templates.
- Click Form templates.
- Expand the list and select the form you want to edit.
- Make the necessary changes.
- Click Save.
¶ How to delete a form template
- Open the Admin section and go to Documents, Forms and Templates.
- Click Form templates.
- Expand the list and select the form you want to edit.
- Click Delete.
¶ Perio
¶ How to complete a new BPE chart…
- Open the Patient Record and navigate to the Perio section.
- Click the ‘BPE’ folder to view the new form
- Click ‘+New BPE’
- Enter the details, and when complete, click ‘Save BPE’
- The chart will be saved to the BPE folder. To view previous BPE charts, click the arrow next to the BPE folder to produce a list of previous charts. Click on the date to view the chart
¶ How to complete a new Plaque Index chart…
- Open the Patient Record and navigate to the Perio section.
- Click the ‘Plaque Index’ folder to view the new form
- Click ‘+New Plaque Index’
- Enter the details, and when complete, click ‘Save Plaque Index’
- The chart will be saved to the corresponding folder. To view previous charts, click the arrow next to the folder to produce a list of previous charts. Click on the date to view the chart
¶ How to complete a new BEWE chart…
- Open the Patient Record and navigate to the Perio section.
- Click the ‘BEWE’ folder to view the new form
- Click ‘+New BEWE’
- Enter the details, and when complete, click ‘Save BEWE’
- The chart will be saved to the corresponding folder. To view previous charts, click the arrow next to the folder to produce a list of previous charts. Click on the date to view the chart
¶ How to complete a Full Perio chart…

- Open the Patient Record and navigate to the Perio section.
- Click the ‘Perio’ folder to view the new form
- Click ‘+New Perio Charts’
- The perio-form will load, divided into two tabs
- Enter the details, and when complete, select “Save Perio Chart”
- The chart will be saved to the Perio file.
- To view previous Perio charts, click ‘Back to Perio list’ and press the arrow next to the Perio folder to produce a list of previous charts. Click on the date to view the chart
To enter double-digit values, use Shift + the number keys on the main keyboard.
¶ How to complete an Intra Oral Exam…
- Open the Patient Record and navigate to the Perio section.
- Click the ‘Intra-Oral’ folder to view the new form
- Click ‘+New Intra Oral pathology Chart’
- Record your findings on the chart and save it
- The chart will be saved to the corresponding folder. To view previous charts, click the arrow next to the folder to produce a list of previous charts. Click on the date to view the chart
¶ How to complete a new Perio Diagnosis Form…
- Open the Patient Record and navigate to the Perio section.
- Click the ‘Perio Diagnosis’ folder to view the new form
- Click ‘+New Perio Diagnosis’
- Enter the details, and when complete, click “Save ”
- The form will be saved to the corresponding folder. To view previous charts, click the arrow next to the folder to produce a list of previous charts. Click on the date to view the chart