DentalPlus+ . The Receptionist Guide…
¶ DentalPlus Log in
Log in using the provided credentials. For multi-site users, select the appropriate clinic upon login.
¶ DentalPlus Sections
Each section of DentalPlus can be accessed through the navigation buttons on the left pane, which are displayed according to the user's access level.

¶ DentalPlus Toolbar
The DentalPlus toolbar provides access to various functions and features, depending on the user's role and permissions.

¶ Patient Record
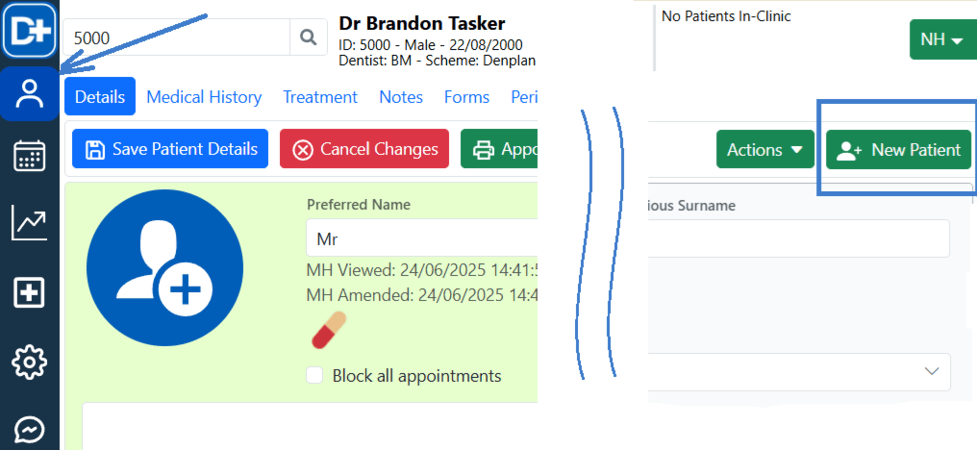
¶ How to Create a New Patient Record
EITHER:
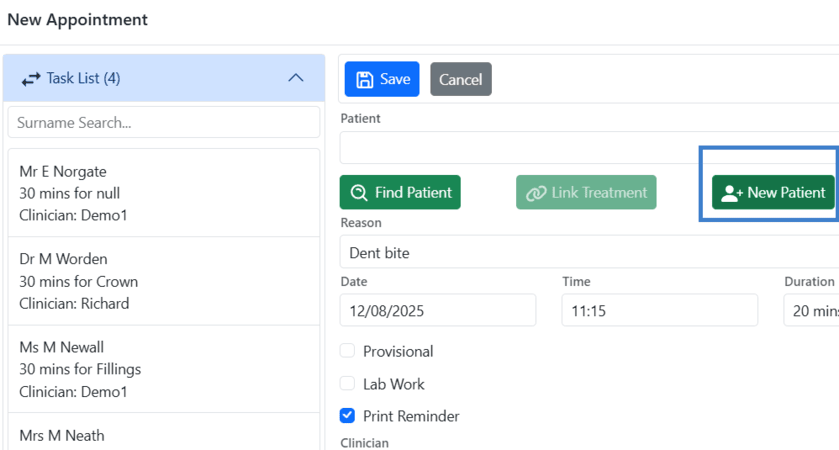
- In the Patient Record, click “+New Patient”
- When making an appointment, select “+New Patient”
 |
 |
- The new record will load.
- Enter patient details.
- When you've finished, click the "Save" button.
Each patient has a unique ID for easy identification and accurate record keeping (e.g ID:5000).
¶ How to Delete a Patient Record
- Navigate to the Patient Record.
- Click on the ‘Status’ drop-down menu.
- Select the appropriate status from the list.

4. Click ‘Save Patient Details’ to apply the changes.
¶ How to update patient contact preferences
Following GDPR, patients must be given the option to choose how they wish to be contacted. DentalPlus offers several ways to manage contact preferences:
- Via the Preferences tab in the Patient Record
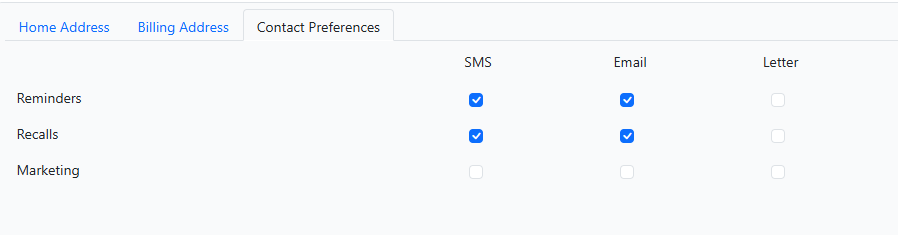
- During patient check-in via the Waiting Room
- Using the Digital Signatures tablet
Tick the appropriate options for how the patient wants to receive reminders and save the changes. A record of the update will be automatically saved in Patient Record > History.
Tip: We recommend enabling at least one method for Reminders and Recalls. These are classified as essential communications for care and do not require explicit consent. However, you must request permission for sending Marketing Newsletters and Offers.
¶ Completing the Medical History Form
.png)
Patients can complete the Medical History Form (MH) in one of three ways:
# Online via the Patient Portal, before an appointment
# On a tablet in the practice (at reception desk or in surgery)
# On a computer with a paper form
¶ → Online
Patients can complete their medical history form online before their visit.
Using a Portal Request:
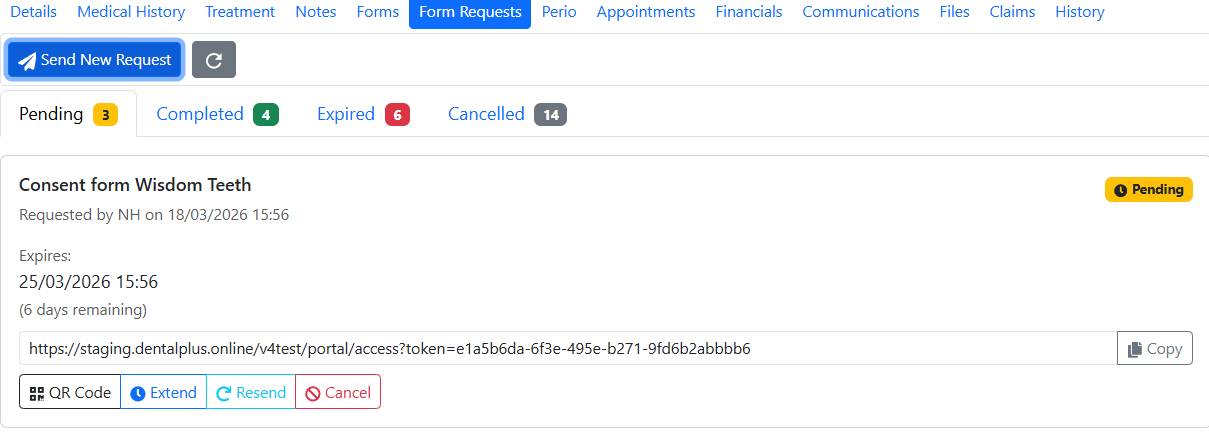
- Open the Patient Record and navigate to Form Requests.
- Click Send New Request.
- In the pop-up window, tick "Medical History Update"
- Select options: an expiry period for a portal link, an optional text message, and a notification method.
- Include other consent or medical forms.
- Send a request.
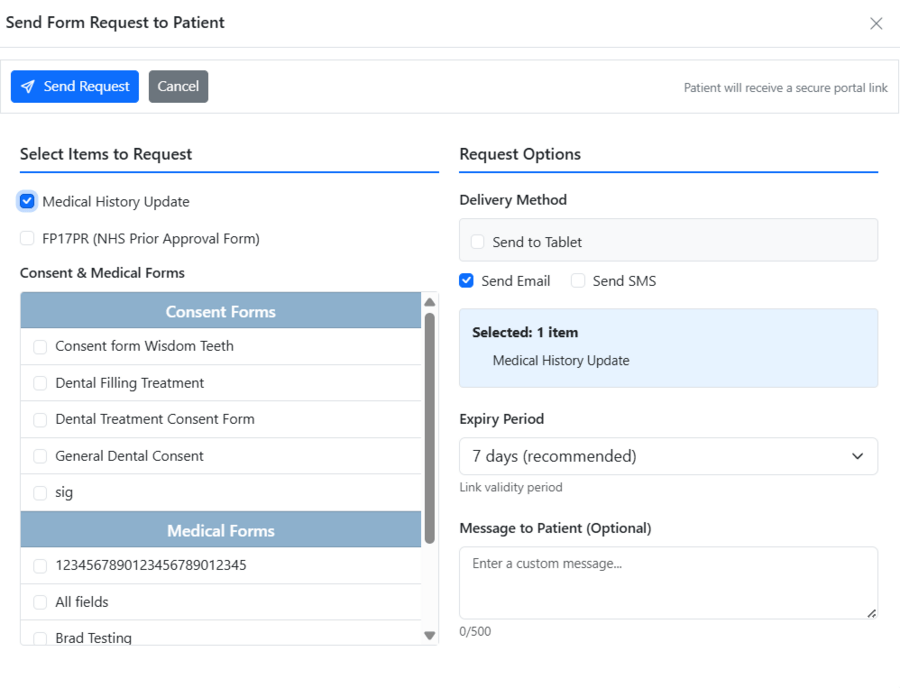
All sent requests can be found in the same section under the ‘Pending’ tab. From there, users can resend requests if necessary, cancel or extend them, or display a QR code for signing on the tablet.
Sending an appointment reminder
1. Open the Patient Record and navigate to Communications.
2. Choose the notification method: email/sms
3. Select a specific template that contains a request for completing a medical history form
4. Click Send.
5. A patient will receive a reminder.
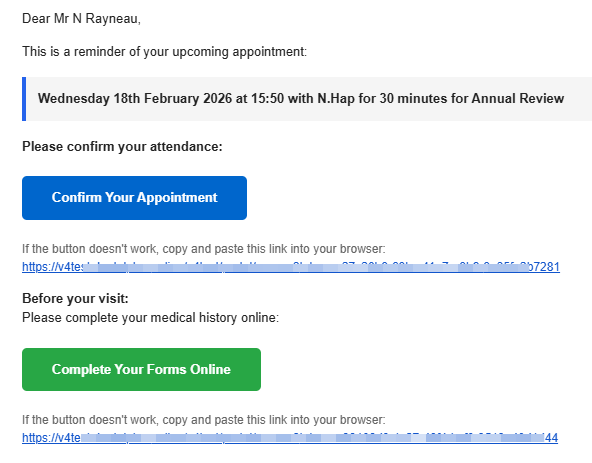
Completing Forms via the Patient Portal
- A patient receives an email or text message, logs into the Portal using a link, and completes the form.
- Once submitted, the completed form appears in Patient Record → Medical History with the note “Medical form completed in portal”.
The system is designed to create, send, and store a wide range of consent and medical forms. Form templates are configured in the Admin section. Once created, they can be sent to patients from Patient Record → Form Requests and completed online via the Patient Portal or tablet. All completed forms are automatically stored in the Forms section of the Patient Record for easy access and review. Read more…
¶ → On a tablet
Patients can complete their Medical History form using a tablet, either at Reception or in Surgery.
On a computer:
- Open the Patient Record and navigate to Form Requests.
- Click Send New Request.
- In the pop-up window, tick "Medical History Update"
- Select the delivery method "Send to Tablet' and select a specific device or scan the QR code.
On a tablet:
- Open the Digital Signature app.
- Scan the QR code to access the form.
- The patient's MH form will appear—hand the tablet to the patient to complete it.
Once submitted, the completed form is automatically saved in the Patient Record→ Medical History .
¶ → On a computer
If the patient prefers, they can complete a paper version of the Medical History Form. After completing, a user might enter it into the system. A paper form can also be scanned and added to the patient record.
Open a Patient Record and navigate to the Medical History tab
- Click “Full Form” to load the current MH form.
- Print a blank form using the ‘Print with no Answers’ button and pass it to the patient.
- Once completed, update the patient's medical history with ‘Yes’ answers.
- Click “Save”.
¶ Patient Files
The Files area is a centralised organiser that lets you store all patient information in one place, making it easy to manage and access important documents.
Users can create folders, upload files, copy and paste documents, and delete items as needed. This helps streamline workflows, ensures key information is readily available, and keeps patient records organised and secure.
¶ Introduction to the Appointment Book
¶ How to book an appointment…
| Appointment Book | QuickFind | Patient Record |
| 1. Navigate to the desired date and time within the Appointment Book. 2. Locate the relevant clinician’s column and right-click on the preferred time slot. 3. Click “New Appointment.” 4. In the appointment window, enter all required details and click “Save”  |
1. Click the QuickFind icon in the Appoitment Book toolbar. 2. Enter the required appointment criteria: date, clinician, reason, duration 3. The system will display a calendar view of all available slots (available times are green, selected times are red). 4. Browse through, click the preferred time slot to book and save.  |
1. Go to the Appointments tab and click “New Appointment” 2. Enter the required appointment criteria: date, clinician, reason, duration 3. The system will display a calendar view of all available slots (available times are green, selected times are red). 4. Click the preferred time slot to book and save. 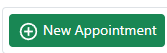 |
- Lab Work: Use this option to note the expected return date of lab work.
- Send Reminder: Enable this to send reminders via SMS, email, or letter. This can be set as a default in:
Admin > Communication Settings. - Link Treatment: Assign future treatments to this appointment.
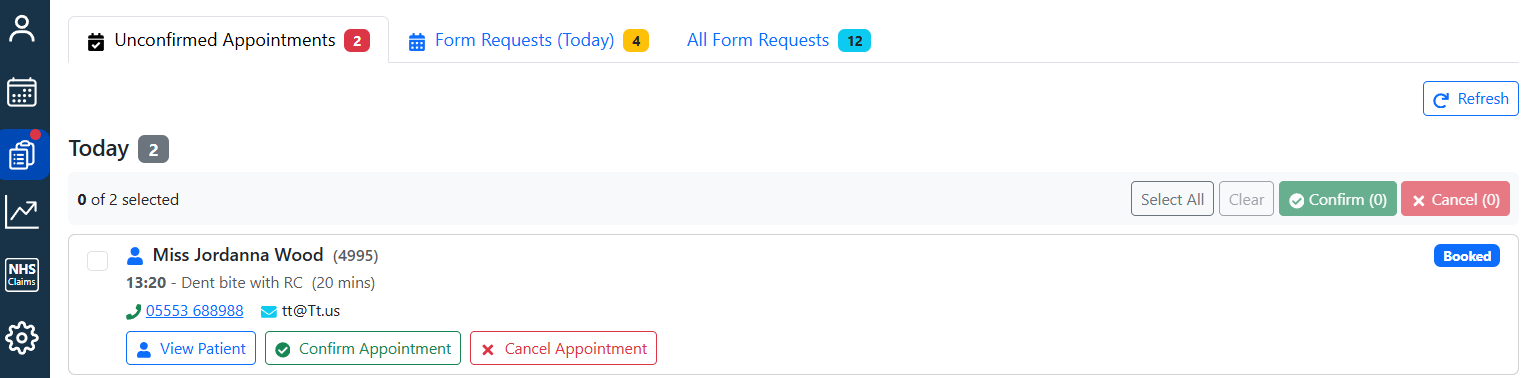
¶ Provisional appointments and Reception dashboard
All new appointments are created with a provisional status, meaning they must be confirmed either by the patient or by the practice.
How appointments are confirmed:
- The system automatically sends appointment reminders and tracks whether the patient has clicked the confirmation button.
- The Reception Dashboard highlights appointments scheduled for today or tomorrow that still require confirmation, allowing the reception team to follow up and confirm them manually if needed.
¶ How to edit appointment details…
In the Appointment Book …
| Change time | Change duration | Change clinician |
| 1. Hover your mouse pointer over the appointment. 2. Drag and drop it into the required time slot under the same clinician. 3. A ‘Change Appointment’ window will appear to confirm the changes 4. Click “Save” to apply |
1. Hover your mouse pointer over the top and bottom edges of the appointment. 2. The pointer will change to a double-sided arrow. 3. Drag up or down to adjust the appointment length. 4. A ‘Change Appointment’ window will appear to confirm the changes 5. Click “Save” to apply |
1. Hover your mouse pointer over the appointment. 2. Drag and drop it into the required time slot under the new clinician. 3. A ‘Change Appointment’ window will appear to confirm the changes 4. Click “Save” to apply |
¶ Task List – How to change an appointment date
1. Right-click the appointment and select “Move to task list”.
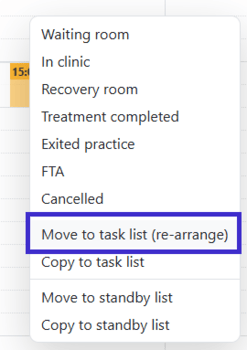
2. Select the desired date from the calendar.
3. In the Appointment Book, right-click and select “New Appointment”
2. Select a patient from the Task List pane
3. The appointment form will automatically populate with the patient’s details.
4. Make any necessary edits, then click “Save.”
When edited, the original appointments details are automatically saved in the Patient Record → Appointment Book → History.
¶ How to cancel an appointment…
| Appointment Book | Patient Record |
| 1. Right-click on the appointment. 2. Select “Cancelled.” 3. A pop-up window will appear — choose a cancellation reason from the list, or enter a custom reason in the “Other” field. 4. Click “Cancel Appointment” to confirm and cancel the appointment only. > You can also send a cancellation sms, email or add it to the Standby list. |
1. Load the Patient Record and go to the Appointment section 2. Select the appropriate appointment under the “Future Appointments” area 3. Click “Cancel Appointments” 4. A pop-up window will appear — choose a cancellation reason from the list, or enter a custom reason in the “Other” field. 5. Click “Cancel Appointment” to confirm and cancel the appointment only. |
¶ How to view a patient's appointment history…
- Load a Patient Record
- Navigate to the Appointments tab
- A list of future and past appointments will appear
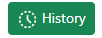
Click the 'History' button to see a history of a particular appointment, including changes and rearrangements.
You can alternatively find a list by single left-clicking on the appointment in the Appointment book and navigating to the ‘Future appointments’ tab
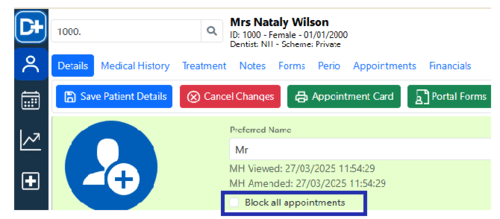
¶ How to block a patient from making an appointment…
- Open the Patient Record.
- Tick the box labelled “Block all appointments” in the Patient Details
- Save changes
Once enabled, the patient will be unable to book any appointments until this option is unticked.
¶ How to manage the patient journey…
A patient’s status can be updated by right-clicking on their appointment and selecting the appropriate option. Not all statuses need to be used—most practices focus on the key ones. Each status offers its own useful functionality that can be applied when needed.
- Waiting Room
- In Clinic
- Recovery Room
- Treatment Completed
- Exited Practice
- FTA
- Cancelled
¶ Standby list
Adding a Standby List item
- Click on the ‘Standby List’ section in the left pane.
- Right-click inside the expanded list and select “New Standby Item”.
- Find a patient and enter the relevant details in the pop-up.
- Click “Save.” The patient will appear in the List.
When a suitable appointment slot becomes available, the user will receive a notification that a patient from the Stanby List can be booked in.
Moving an Existing Appointment to the Standby List
- In the Appointment Book, right-click on the appointment.
- Select “Move to Standby List.”
- The appointment will be removed from the Appointment Book and added to the Standby List.
Updating details
- Double-click a required item in the list
- Edit details
- Click ‘Save’
Delete appointment
- Click the "Standby List" panel to enlarge the list.
- Find the appointment and right-click.
- Click 'Delete' and confirm the deletion.
¶ Appointment Book management
¶ How to manage clinician display…
1. In the Appointment Book, click “Clinicians"
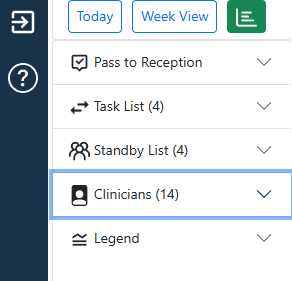
2. The list will expand
3. Tick or untick the boxes next to the clinicians’ names to show or hide them in the Appointment Book.
These settings are user-specific and will not affect the view for other users. There is no limit to the number of clinicians displayed in the Appointment Book.
¶ How to print a day list
1. Click the “Print Day List” button
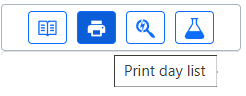
2. Select the date, clinicians and details to show.
3. Hit “Produce List” to open a PDF file with data.
4. Print or download the list
¶ How to block slots in the Appointment Book
- In Admin, open Rota and find a clinician in the list.
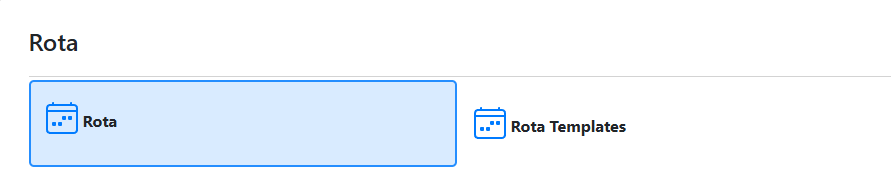
2. Right-click on the required day
3. Choose ‘New Block’ in the appearing menu
4. Enter the start and end time.
5. Select the colour.
6. Uncheck 'Allow Appointments' and 'Allow Online Booking'. This indicates that the system will block a slot.
7. Click “Save”.
¶ How to manage lab work
¶ Recording lab work
1. Click an appointment in the Appointment Book
2. Navigate to the Lab Work section.
3. Enter the required details
4. Click “Save”
¶ Managing lab work
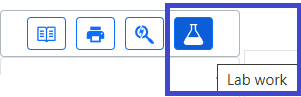
- In the Appointment Book toolbar, click the Lab Work button.
2. A pop-up window will appear displaying all active lab work on the left side.
3. Select the relevant lab work, update the details as needed or mark it as completed, then click Save.
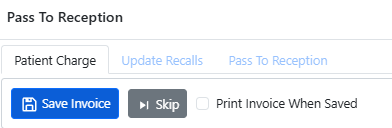
¶ How to use Pass to Reception…
The “Pass to Reception” option sends instructions to the reception team, outlining the actions required once the patient’s treatment in surgery is complete.
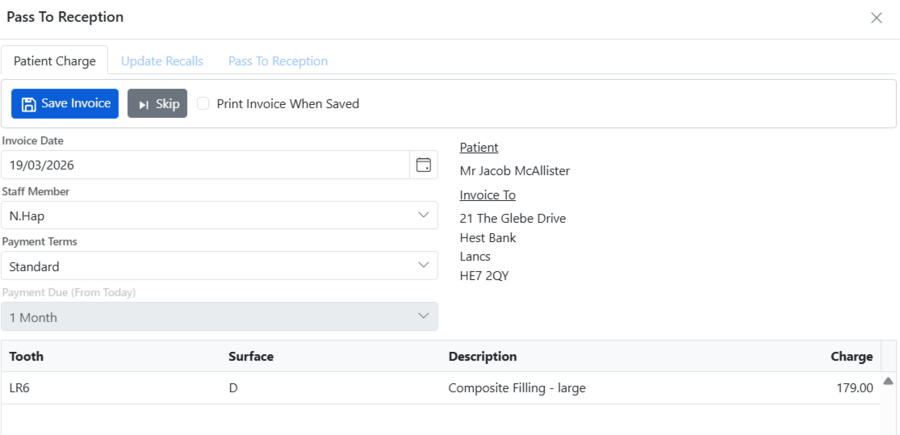
In the Patient Record → Treatment section, click “Pass to Reception” on the top toolbar.
Step 1: Patient Charge – Review the invoice details, then save or print as required.
Step 2: Update Recalls – Check and confirm the recall timeframe. This is important for staying in touch with patients who do not have future appointments.
Step 3: Pass to Reception – Add details for the next appointment. And send the ‘Pass to Reception’ task.
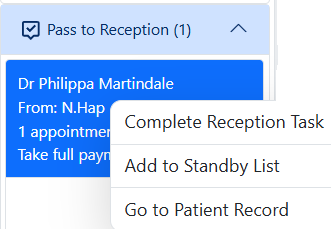
Step 4: Complete the Pass to Reception tasks
- Expand the list and double-click on the patient name
- Check details, take payment
- Book future appointments
- Click the Loupe icon, select the required appointment slot, and save the booking.
- If no suitable slots are available, add the patient to the Waiting List.
- Once all steps are completed, the pop-up window will close, and the Pass to Reception task will disappear from the list.
- A task can also be completed manually by right-clicking on the patient in the Pass to Reception list.
Once the Pass to Reception task is completed, update the patient’s status to “Exited Practice” in the Appointment Book.
¶ Patient Communication
¶ How to send an email…
1. Open the Patient Record and go to the Communications section.
2. Click either “New Email”
3. Choose a document to send in the “Choose template” drop-down or enter or copy/paste a message in the editor.
4. You can add attachments if needed. Files can be attached directly or replaced with download links for easier access and sharing.
5. Select a signature for email.
6. Click “Send”
Choose the right communication channel: Emails - Good for detailed messages like pre-appointment instructions or invitations. Sending emails is unlimited and free of charge.
¶ How to send an SMS…
1. Open the Patient Record and go to the Communications section.
2. Click either “New Email”
3. Choose a document to send in the “Choose template” drop-down or enter or copy/paste a message in the editor.
4. You can add attachments if needed. Files can be attached directly or replaced with download links for easier access and sharing.
5. Select a signature for email.
6. Click “Send”
- Text Messages: Each text message is limited to 160 characters (including letters, numbers, punctuation, and spaces). Messages longer than this will use more than one credit.
- Emails - Good for detailed messages like pre-appointment instructions.
Choose the right communication channel: Text Messages (SMS) - High open rate, ideal for short reminders.
¶ How to Print a Letter
- Open the Patient Record and go to the Communications section.
- Click “New Letter”.
- Create a letter or use a template from the templates menu
- Edit the document if required.
- Click ‘Print Letter’ to print it os save as a PDF file
Once printed, the document is automatically saved in the Patient Record. Saving the edited version will not affect the original template.
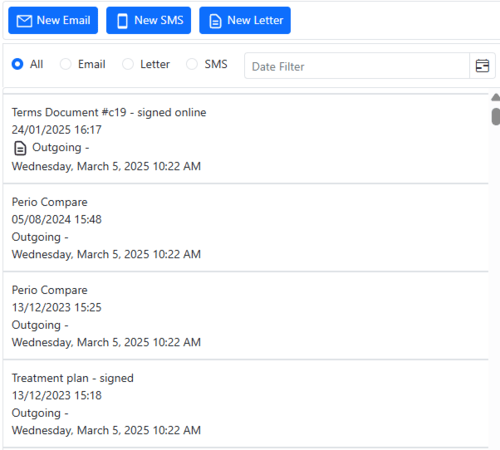
¶ How to view all sent documents…
1. Open the Patient Record and go to the Communications section.
2. All documents will be displayed in the list on the left side.
3. Click on any document to view the content
4. Filter them by type or date
¶ Patient Retention
¶ How to send a Reminder…
| Auto Reminders | via Appointment Book | via Patient's Communications |
| The system automatically sends appointment reminders to patients via SMS or email a set number of days in advance. All reminder settings can be configured in Admin →Practice Setup → Communication Settings |
- Sigle-click the appoitment and click ‘Send Reminders’ in the ‘Patient Detail’ tab. - Choose a reminder template and click ‘Send’. |
- Open the Patient Record and go to the Communications section. - Click either “New SMS” or “New Email”, enter a message or choose a template and click ‘Send’. |
¶ Keeping patient contact details up to date…

* When booking a patient to the Waiting Room in the Appointment book, a pop-up will appear allowing you to update their email and mobile number.
* Update the patient contacts, mailing preferences and Recall dates in the Details section of the Patient Record
* Update the recall due date in the Treatment section → Pass to Reception
* These details can be kept up to date using the tablet app
* Ask that the patient log in to the Patient Portal and update their details online.
¶ Managing Patient Financials
¶ Invoicing
- Open the Patient Record and go to the Treatment section.
- Tick the “Completed” checkbox next to each treatment in the treatment plan.
- Click “Pass to Reception” on the top toolbar
- Check details: date, staff member and payment terms.
- Save invoice
- The invoice will appear in the Patient Financials.
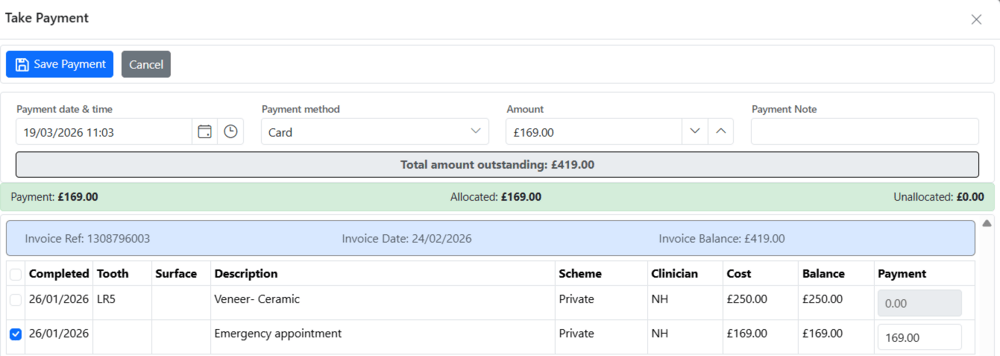
¶ How to take a payment…

- Open the Patient Record and go to the Financials section.
- Click ‘Take Payment’
- Select the date and payment method.
- Enter the amount to be paid
- Allocate this payment to outstanding invoices if required
- Click ‘Save payment’
- The payment will appear on the list.
The system allocates payments to specific treatments. Uncheck a treatment to link the payment to the corresponding one.
¶ How to take a deposit …
A deposit payment is not allocated to any existing invoice. It remains available until the user decides to link and apply it.
- Open the Patient Record and go to the Financials section.
- Click ‘Take Deposit ’
- Select the date and payment method.
- Enter the amount to be credited
- Choose who the deposit is credited to.
- Click ‘Save deposit’
- The payment, being coloured yellow, will appear on the list.
Each deposit is required to be allocated to the invoice.
¶ How to allocate a deposit…
- Open the Patient Record and go to the Financials section.
- Right-click the required invoice and select ‘Allocate Payment’.
- Choose an available pre-payment from the list, then click ‘Save Payment’.
Only one payment can be allocated at a time, so if multiple deposits need to be applied, repeat these steps
Expand the deposit details to see which treatment it is allocated to, how much has been used, and the remaining balance.

¶ Processing a sundry sale…
- Open the Patient Record and go to the Financials section.
- Click ‘Sundry Sale’
- Select an item from the menu
- Change the price if necessary
- Choose quantity
- Assign the sale to a specific clinician or practice
- Click ‘+Add’
- Repeat these steps if needed
- Click ‘Save’ to submit the invoice
¶ How to edit payment details…
1. Open the Patient Record and go to the Financials section.
2. Right-click on the payment and select “Edit Payment”
3. The following details can be edited:
• Staff – this will automatically be the default clinician of that patient
• Payment method – how the payment was made
¶ How to delete payment…
1. Open the Patient Record and go to the Financials section.
2. Right-click on the required payment and select “Delete Payment”
3. A pop-up will appear — enter the reason for deletion and click “Delete.”
4. The payment will be marked as deleted.
Deleted payments remain visible in Financials. They appear in grey and can be viewed by using Filter → Show Deleted Items.
¶ How to manage financial documents…
Printing
- Open the Patient Record and go to the Financials section.
- Invoice – Right-click the invoice and select “View Invoice” to print or email it.
- Receipt – Right-click the payment and select “View Receipt” to print or email it.
- Statement – Click “Print Statement” on the toolbar. The statement will open as a PDF, which can be printed, emailed, or saved.
Emailing
- Select the required document by ticking the box in the left column in Financials.
- Click the ‘Email’ icon on the toolbar.
- Choose a template, select a signature, and send it to the patient.
¶ Financial amendments…
Depending on the situation, the system allows for refunding account credit and paid invoices, transferring balances within a family member, and issuing credit notes.
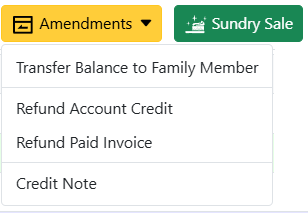
→ Transfer Balance to a Family Member: A patient’s positive balance can be transferred to a linked family member.
- Open the Patient Record → Financials section and click ‘Amendments’.
- Click ‘Transfer Balance to Family Member’
- Select a family member.
- Choose an available payment or payments.
- Enter an amount
- Click ‘Transfer Balance’.
A corresponding record will show in both patient records.
→ Issue a Credit Note: A credit note can be issued to reverse all or part of an invoice, generating a corresponding credit on the patient’s account. It might be used for future treatments or issued immediately.
- Open the Patient Record → Financials section and click ‘Amendments’.
- Click ‘Credit note’
- Select a reason and date, and enter the amount.
- Click ‘Save Credit Note’.
- Records marked in red will appear in the list and can be used for future invoices.
You can issue an immediate refund if the patient requests it. Simply tick the appropriate box and select the refund method.
→ Refund Account Credit: If a patient has a positive balance, the refund can be processed directly from the available account credit.
- Open the Patient Record → Financials section and click ‘Amendments’.
- Click ‘Refund Account Credit’
- Select a reason and date, enter the amount, and choose the refund method.
- Select a payment to be refunded
- Click ‘Save Refund’.
The record, coloured in purple, will then show on the list.
→ Reduce/Refund a paid invoice: A paid invoice can be refunded by applying a discount that reduces the original charge and updates the patient’s account accordingly. This option is applicable only when the patient’s balance is zero or negative.
- Open the Patient Record → Financials section and click ‘Amendments’.
- Then click ‘Refund Paid Invoice’
- Select a reason and date.
- Choose the invoice to be adjusted
- Enter the amount
- Click ‘Apply Credit Note’.
- The record, marked in red, will thereafter appear on the list.
You can issue an immediate refund if the patient requests it. Simply tick the appropriate box and select the refund method.
¶ DentalPlus Messenger
- Access it from the left main menu.
- Click the name of the person you want to message and send your message.
- Use the search function to find a person if needed.
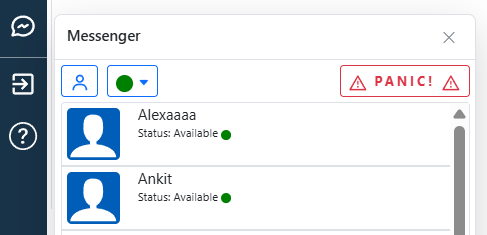
Logged in Staff are shown with a green online indicator. Each user can update their own status as needed.