DentalPlus+ . The Practice Manager Guide…
DentalPlus offers a comprehensive set of features designed to help manage dental practices effectively.
¶ User Setup
The User Setup section allows administrators to create and manage user accounts. Here, you can define user roles, assign permissions, and control access to different features, ensuring each team member has the appropriate level of access. Proper configuration of the User Setup section helps maintain data security, supports efficient workflows, and ensures compliance with practice policies.
¶ System Access
This section allows administrators to add, update, and delete users by defining their names, email addresses, and practice access. It also displays a list of all active users, making it easy to manage who can access the system.
¶ Practice Staff
This section allows administrators to manage the configuration and permissions for each user’s account, ensuring staff have the appropriate access based on their role.
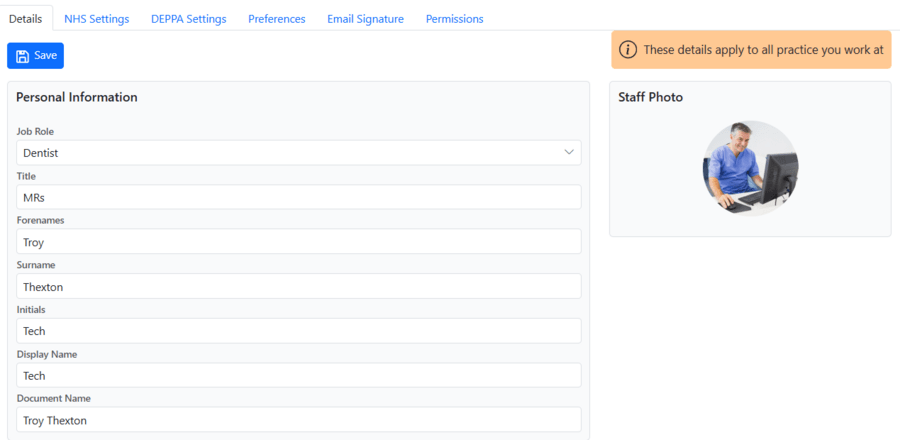
- Find the required user and click Manage.
- Add personal information and a photo on the Details tab.
- Enter NHS or DEEPPA settings if necessary.
- Set preferences, including
- default login page
- language
- default appointment reason and Recall duration
5. Create a personal email signature
6. Set permissions by applying an existing permissions template or creating a custom role.
¶ Rota
The Rota module allows dental practices to manage clinicians’ working schedules efficiently. It provides tools to set up and adjust working hours, lunch breaks, days off, holidays, and recurring shifts. A rota ensures that appointment books accurately reflect clinician availability, prevents double-booking, and supports long-term planning.
The rota is a weekly schedule listing clinical staff and their working days. Each working day can be divided into blocks if needed. The section allows full management of the duty schedule by copying and pasting days, inserting blocks, deleting entries, and exporting the data.
.png)
- Working hours are based on the practice's default operating hours, unless otherwise specified. They appear as white space in the Appointment book.
- If a clinician is marked unavailable, the day will appear in dark grey, and appointments cannot be booked during this time.
- Other time slots will be shown in different colours based on the settings.
¶ How to add working hours
To begin scheduling, click on any cell in the grid. Each cell represents one clinician on one day. By default, the system displays the current week; this can be changed in the calendar at the top. When you right-click a cell, a menu with options will appear .
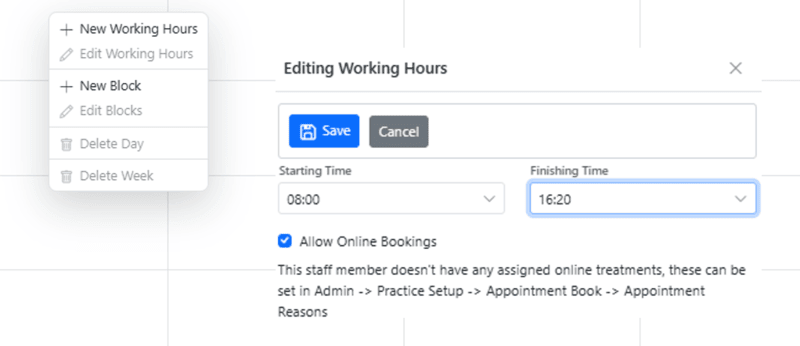
¶ How to define working hours:
- Select ‘New Working Hours’.
- The system automatically suggests choosing the practice working hours, but the start and end times can be adjusted if needed.
- Allow or restrict online bookings during that time.
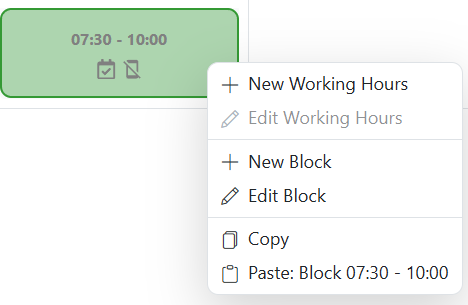
- Click Save, and the working slot will appear .
¶ How to add time off or any time block
Breaks such as lunch, specific time slots, or holidays can be easily added to the schedule.
Right-click a cell and choose ‘New Block’.
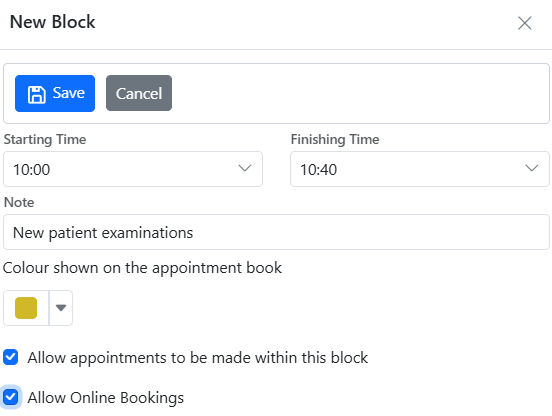
- Enter the time range
- Add a note, such as “Lunch Break”
- Choose a colour to distinguish it visually
- Decide whether to allow appointments or online bookings
¶ How to use a Template
The system provides a range of pre-set Rota templates, eliminating the need for repetitive manual entry.
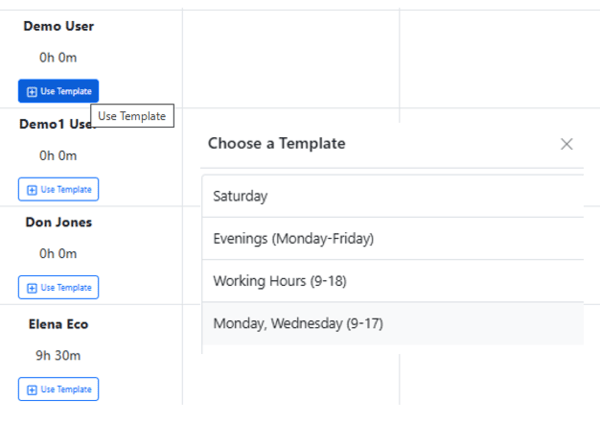
To apply a template, click the Plus (+) button, select the required template, and the system will automatically populate the working hours based on the saved schedule. If needed, users can still adjust or remove any of these hours directly within the Rota.
¶ How to edit working hours
To edit an existing block
- Right-click on it and choose ‘Edit Block’
- Update the time or settings
- Save changes
¶ How to delete working hours
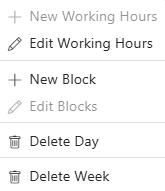
To delete a working block, right-click on it, select Edit Blocks, choose the block, click Remove Block, and update the working hours.
To remove an entire day, right-click on the day and select Delete Day.
To clear a full week’s schedule for a specific clinician, right-click the relevant cell and choose Delete Week from the menu.
Use the Clear Out Entire Week option in the top toolbar to remove all working hours for every clinician for that week.
¶ Copy/Paste this week options
Once the working hours for an entire week have been set up, the schedule can be easily replicated for future dates using the copy and paste functions in the Rota. This saves significant time, particularly when clinician schedules remain consistent from week to week.
Paste onto this week
- Add working hours for the entire week
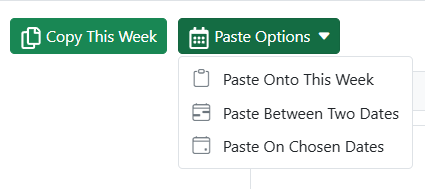
- Click the “Copy Week” button. This will activate the “Paste Options” menu.
- Navigate to the week you want to copy the schedule to using the calendar
- Click “Paste onto this week".
- Confirm overwriting the existing working hours for this week.
- Save changes
The full schedule—including working hours, breaks, and other blocks—will be copied from the current week and applied to the new one for all clinicians. You can repeat this process as needed by continuing to scroll through the calendar and pasting the same schedule across multiple weeks.
Paste between two dates
- First, copy the desired week.
- Click “Paste Options"
- Choose “Paste between two dates”
- In the pop-up window, select the starting and ending week for where you want the schedule to be applied.
🔔 Note: Only Mondays can be selected in the calendar, since the system organises schedules by full weeks. - Enable the “Alternate Weeks” checkbox if necessary.
- Confirm overwriting the existing working hours for these weeks and save changes
Paste on chosen dates
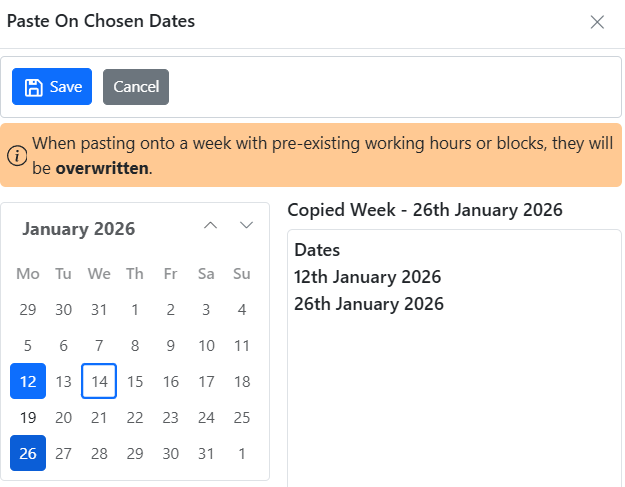
- Copy a week.
- Choose “Paste on Chosen Dates”.
- Select one or more Mondays in the calendar.
- The system will apply the copied schedule to each selected week.
This method is ideal for non-consecutive weeks or customised scheduling patterns.
All saved working hours are automatically reflected in the Appointment Book. This ensures that available time slots are accurate and always up-to-date for booking and online scheduling.
¶ Rota templates
Rota templates are a tool designed to streamline clinician scheduling. They are predefined weekly schedules that can be saved and applied to any clinician's calendar. They are ideal for: full-time hours (e.g., Monday to Friday), part-time availability (e.g., specific days only), evening shifts for hygienists or associates. Instead of recreating schedules from scratch, simply apply a saved template, and the rota is ready in seconds.

How to Create a Rota Template
1. Go to the Admin →Rota and open Rota Templates.
2. Click “New Template”.
3. Name a template with a clear name—for example: "Monday –Friday Full Time" or "Evenings Only"
4. Click Save. A template layout now appears on the screen.
Defining Working Hours
- Right-click on the red block for a day and select ‘New Working Hours’.
- The system automatically suggests practice working hours, but the start and end times can be adjusted as needed.
- Allow or restrict online bookings during that time.
- Click Save. The working hours will appear as a white block in the template.
Adding lunch, breaks or time blocks

1. Right-click on any block.
2. Select ‘New Block’.
3. Set the time range, add a note, and choose a colour to help visually identify the block.
4. Check or uncheck both options for appointment and online booking.
5. Click Save, and the block will appear. The icons indicate if appointments and online bookings are allowed.
Copying Blocks to Other Days
If a clinician's working hours are consistent across multiple days:
- Right-click on a time block and select ‘Copy’.
- Then, right-click on another day and choose ‘Paste’.
Repeat this as needed to build out the week.
Managing Rota Templates
→ To View Saved Templates
- Access all saved templates from the top-left dropdown menu.
- Click the dropdown to display a list of templates and select one to view its schedule.
→ To Rename or Delete a Template
- Use the toolbar buttons to rename or delete templates as needed.
→ To Edit or Remove a Time Block
- Right-click on any block in the template.
- Select ‘Edit Block’ to update settings, or ‘Delete Block’ to remove it.
Applying Templates to Clinician Schedules
Once a rota template is complete, the user can apply it at any time:
- Go to Admin > Rota.
- Select a week
- Click the + button and choose a saved template.
The working hours from the template will be automatically applied to the selected week. Time blocks can be modified or removed afterward if needed.
¶ Practice Reports
Running a dental practice efficiently depends on having quick access to the right information. DentalPlus offers a range of reports designed to help you track patient activity, manage finances, and keep day-to-day operations on track.
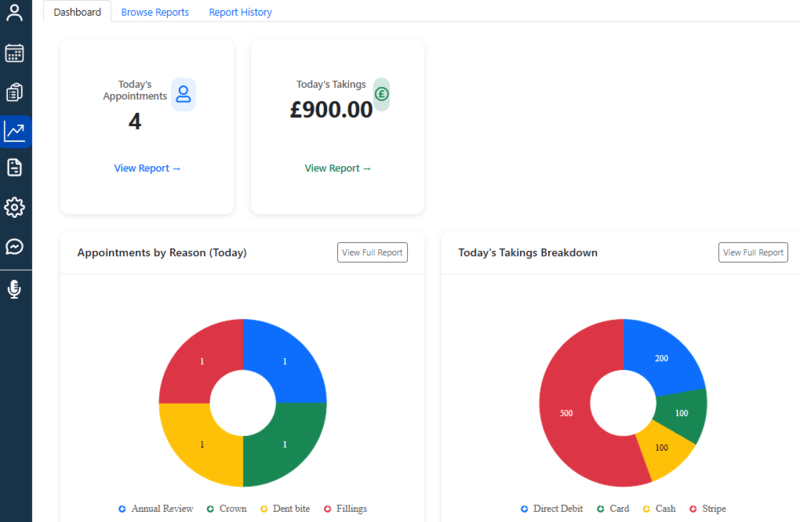
¶ The Dashboard
The tab can be accessed through the main left menu by clicking Reports, which displays real-time graphs and figures, giving you a quick view of today’s activities, including treatments performed and takings received.
¶ Browse reports
Under this tab, users will find detailed reports which provide detailed, actionable insights that help dental teams monitor performance, track progress, and make informed decisions to improve efficiency and patient care.
- Click the required report to display the available filters.
- Set the filters and generate the report.
- The results will be displayed on the screen.
- From the results, you can:
- Print the report for further use, or
- Select patients from the list and send batch communications using the Create Document functionality.
To find reports more quickly, you can search by report name or use filters to narrow down the list.
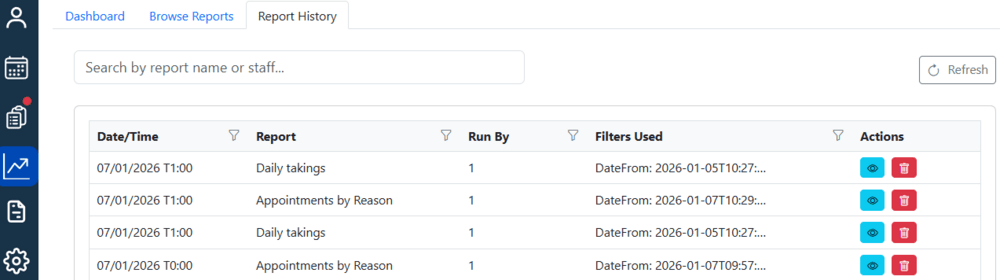
¶ Previous reports
This tab allows you to access data from previously run reports. Simply search for a report by name, click the eye icon to view the results, or delete it if necessary.
The Dashboard is designed to give you an immediate overview of what’s happening in your practice today, while the Reports tabs provides more detailed insights. Additional reports are continuously added to enhance the dashboard and provide a fuller picture of practice activity.
¶ Practice Setup
Practice Setup is the central area where administrators configure and maintain core practice-wide settings.
¶ Practice details
The section stores all core practice information in one place: contact details, address, working hours and NHS details. This helps present accurate information in reports, communications, and patient records.
¶ Permission levels
The Permissions section allows practices to control system access. By managing permissions centrally, administrators can ensure users only see and use features relevant to their role, supporting data protection, regulatory compliance, and smoother day-to-day workflows. The system supports predefined roles such as Full Access Practice Admin and Partially accessed Reception member, as well as the ability to create fully custom roles tailored to the practice’s needs.
.png)
¶ Job roles
This section defines and manages all user roles within the practice.
¶ Communication settings
This section contains settings for how the practice communicates with patients. Users can configure reminder and follow-up communications, including the timing in days, ensuring patients are contacted promptly to keep appointments, complete treatments, and provide valuable feedback.
¶ Text reports
The Text Report section provides oversight of text usage and activity. This helps practices monitor communication costs, track message performance, and make informed decisions about patient outreach strategies.
¶ General system settings
General Settings centralise system-wide preferences that affect how the software behaves across the practice. Managing these options in one location ensures consistent system performance and reduces the risk of conflicting configurations.
¶ Patient record settings
This section controls how patient records are structured and displayed throughout the system.
¶ Practice clinical note templates
Clinical note templates are stored centrally to support consistent, compliant clinical documentation. This saves time for clinicians, improves record quality, and ensures notes align with practice standards. Read more…
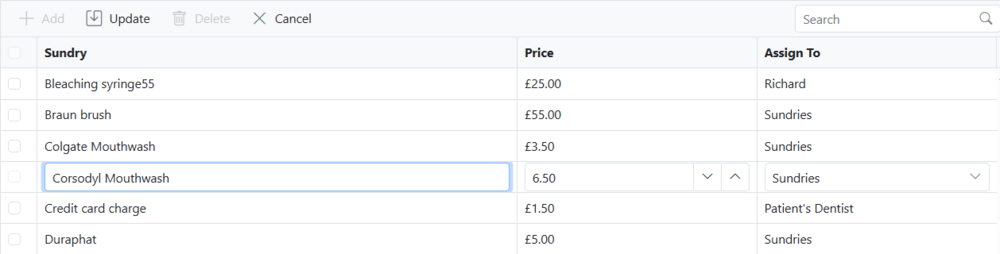
¶ Sundries
The Sundries section manages non-treatment items, helping to ensure accurate billing, consistent pricing, and clearer financial reporting.
To add a new sundry item:
- Click +Add
- Enter a name, price and assign to a specific clinician or practice
- Click Update
To update a sundy item
- Double-click on the name, price, or assigned clinician/practice.
- Make the necessary changes.
- Click Update
To delete a sundry item
- Select one or more items from the list.
- Click Delete
¶ Schemes
The system allows practices to manage patient schemes directly from the Admin section.
To add a new scheme: Click + New Scheme and enter the scheme details.
To update or delete an existing scheme: Double-click the scheme you want to modify. Make the necessary changes or delete it.
¶ Scheme Bulk Pricing
This functionality allows practices to update multiple scheme prices. This saves administrative time and ensures pricing changes are applied consistently across the system.
¶ Current Prices
The current system prices are displayed on the first tab in a table, where rows represent treatment items and columns represent patient schemes.
- To update a price: double-click any cell, edit the price, and save the changes.
- To adjust all prices for a scheme: use the % Bulk Price Scheme functionality to increase or decrease all treatment prices for that scheme.
- To copy prices to another scheme: select one scheme and copy all prices to the desired scheme.
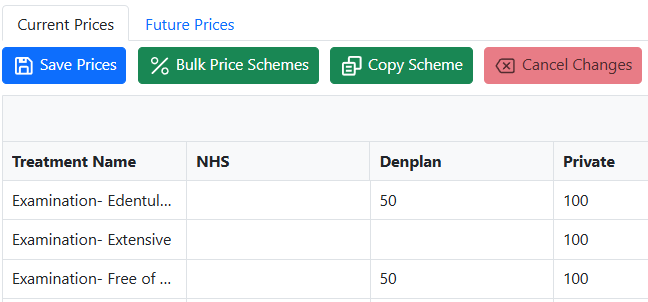
¶ Future Prices
To schedule price changes, go to the Future Prices tab.
- Make changes manually by entering a new price, or use the % Bulk Price Scheme to adjust prices for a scheme.
- Select the start date for the price changes to take effect.
- Click Save Prices to schedule the update.
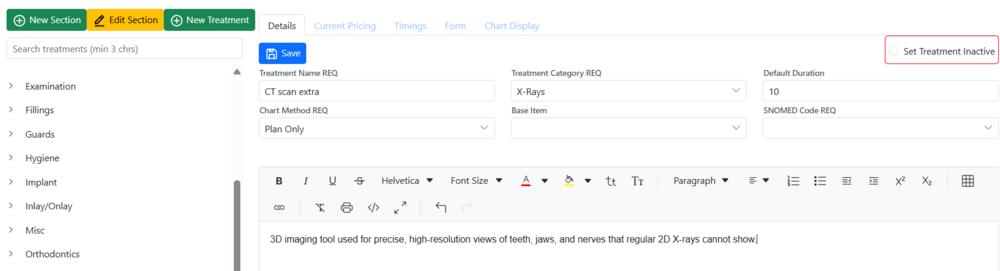
¶ Treatment editor
This powerful tool gives users the flexibility to manage treatment setup and configuration. With the appropriate permissions, a user can:
- Add, edit or delete a treatment section
- Configure existing treatments by setting default timing, charting method, and treatment notes.
- Set existing treatments as inactive to remove them from the price listing.
- Add new treatments
¶ Appointment book configuration
This section controls appointment book behaviour and display settings across the practice.
- Configure general setting
- Add, edit or delete existing appointment reasons
- Manage online booking reasons
- The list of cancellation reasons
¶ Text credit management
Top up text credits with just one click! This provides consistent patient communication and allows the practice complete control over communication costs.
The Practice Setup section ensures the system is fully aligned with the practice’s clinical, administrative, and communication requirements.
¶ Directory
The Directory section stores complete details for referring clinicians, laboratories, and other counterparties, keeping all key contacts in one central location.
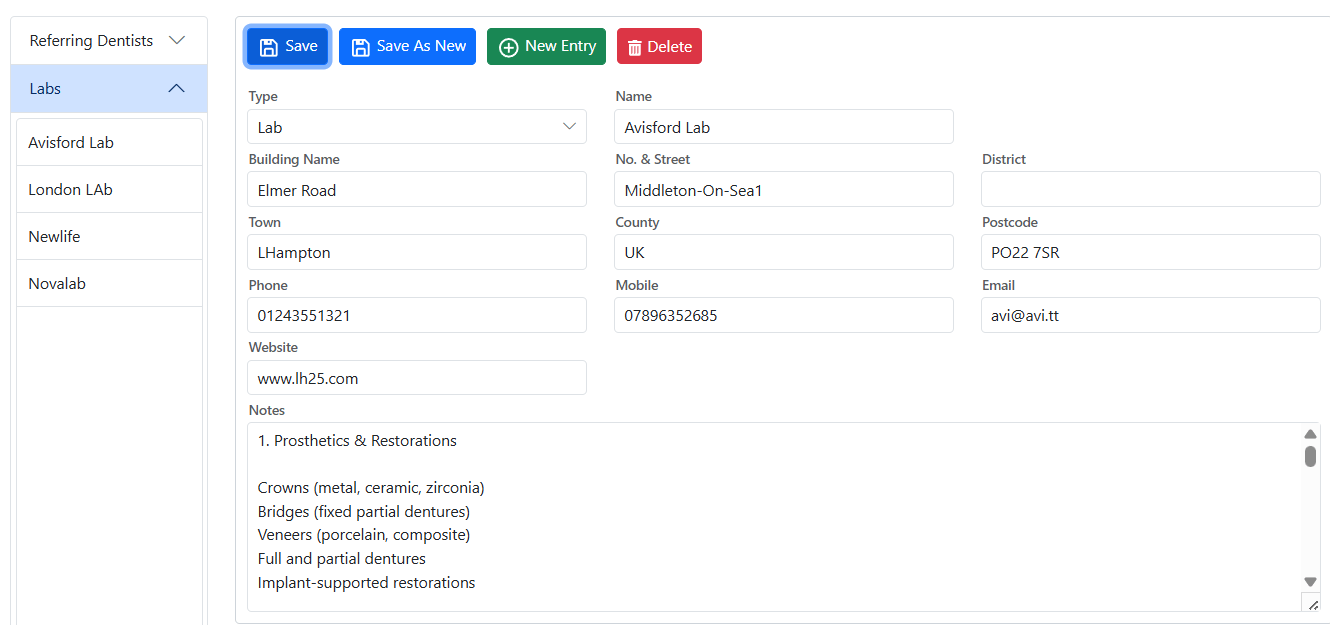
Available options in this section:
- + Add New Entry – create a new contact.
- Save as New – save changes as a new record without overwriting the original.
- Edit and Save – update existing contact details.
- Delete – remove an entry from the directory.
¶ Documents, Forms and Templates
The Document Templates functionality is designed to help practices create, manage, and reuse standardised documents for patient and administrative communication. By using predefined and customisable templates with built-in merge fields, practices can automatically populate documents with patient and practice data, ensuring accuracy, consistency, and professional presentation while significantly reducing the time spent on repetitive document creation.
¶ SMS Templates
SMS templates are short, predefined text messages for reminders, notifications, and alerts sent to patients. They play a key role in reducing no-shows and keeping patients consistent with their oral care. These templates are easily customisable, allowing dental practices to send timely, professional reminders with minimal effort.
SMS template should be short. 160 symbols = 1 text credit.
- Open the Admin section and navigate to the Documents, Forms and Templates section.
- Click SMS templates.
¶ How to add a new SMS template
- Click + New.
- Enter a document name.
- Choose a category and language.
- Enter the message text. You can add mail merge fields to automatically include patient-specific data in the SMS.
- Click Save.
- The new sms template will then appear in the list on the left-hand panel.
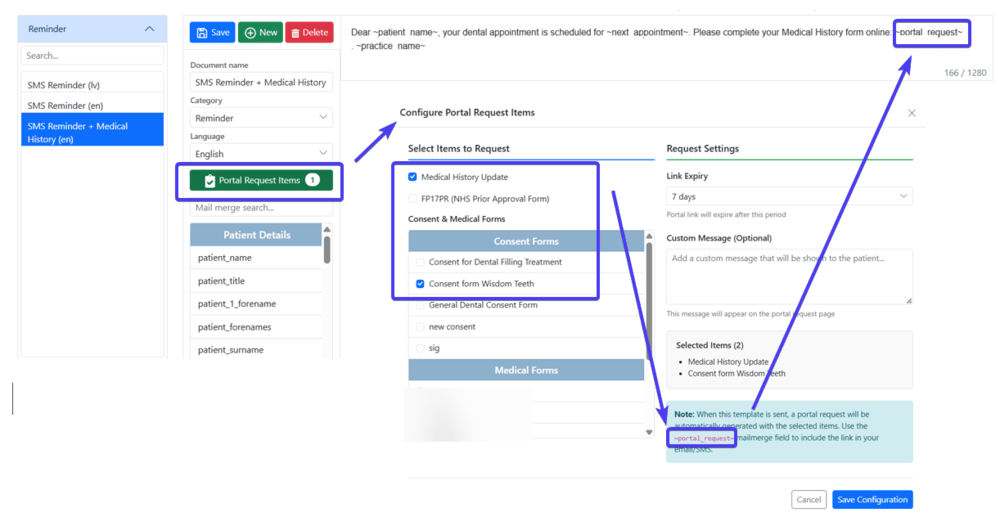
¶ Adding a Link to a Medical Form in an SMS Template
You can include a link to any medical form configured in the system within an SMS template.
- Click the green Portal Request Items button.
- Select the required forms.
- Copy the ~portal_request~ mail merge field and save the configuration.
- Paste ~portal_request~ into the SMS template text.
- Save the template changes.
¶ How to edit an SMS template
- Open the Admin section and go to Documents, Forms and Templates.
- Click SMS templates.
- Expand the list and select a template you want to edit.
- Make the necessary changes.
- Click Save.
¶ How to delete a template
- Open the Admin section and go to Documents, Forms and Templates.
- Click SMS templates.
- Expand the list and select the form you want to delete.
- Click Delete.
¶ Email Templates
They are used to create standardised email messages for patient and practice communication, ensuring consistent wording and branding.
Emails have no character limits, allowing users to include more detailed information, images, and formatting as needed.
¶ How to add a new Email template
- Click + New.
- Enter a document name.
- Choose a category and language.
- Enter the email text.
- You can add mail merge fields to automatically include patient-specific data.
- Format the content as needed by changing font styles, structuring text with paragraphs, and adding tables, lists, or clickable links.
- Add a portal request item if required
- Click Save.
- The new email template will then appear in the list on the left-hand panel.
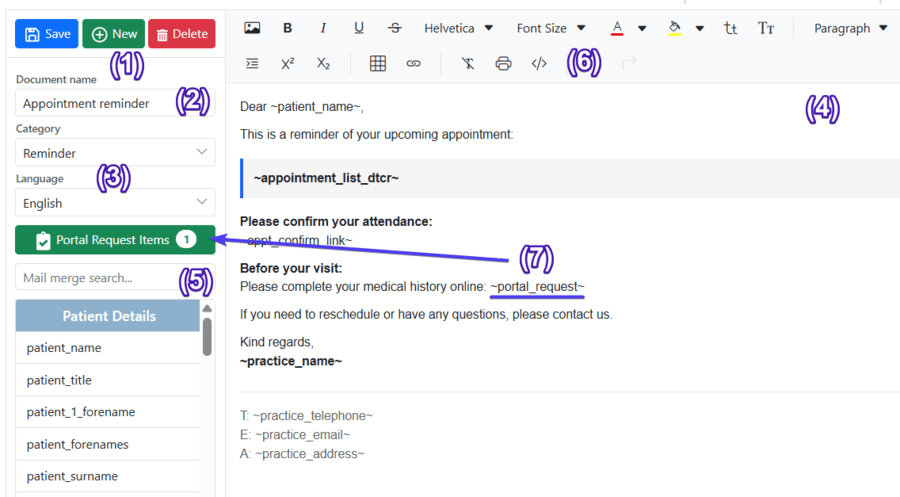
¶ Adding a Link to a Medical Form in an Email Template
You can include a link to any medical form configured in the system within an Email template.
- Click the green Portal Request Items button.
- Select the required forms.
- Copy the ~portal_request~ mail merge field and save the configuration.
- Paste ~portal_request~ into the email template.
- Save the template changes.
¶ How to edit an email template
- Open the Admin section and go to Documents, Forms and Templates.
- Click Email templates.
- Expand the list and select a template you want to edit.
- Make the necessary changes.
- Click Save.
¶ How to delete a template
- Open the Admin section and go to Documents, Forms and Templates.
- Click Email templates.
- Expand the list and select the form you want to delete.
- Click Delete.
¶ Letter Templates
They provide reusable formats for printed or electronic letters, such as referrals, confirmations, and official correspondence.
¶ How to add a new Letter template
- Click + New.
- Enter a document name.
- Choose a category and language.
- Create a letter in the editor area.
- Use mail merge fields to insert patient-specific data automatically.
- Format the content as needed by changing font styles, structuring text with paragraphs, and adding tables, lists, images or clickable links.
- Click Save.
- The new letter template will then appear in the list on the left-hand panel.
¶ How to edit a letter template
- Open the Admin section and go to Documents, Forms and Templates.
- Click Letter templates.
- Expand the list and select a template you want to edit.
- Make the necessary changes.
- Click Save.
¶ How to delete a template
- Open the Admin section and go to Documents, Forms and Templates.
- Click Letter templates.
- Expand the list and select the form you want to delete.
- Click Delete.
¶ Form Templates
They are used to design structured digital forms for patient data collection, consents, and clinical or administrative documentation.
¶ How to add a form template
- Open the Admin section and navigate to the Documents, Forms and Templates section. Click Form templates.
- Click + New.
- Enter a form name.
- Choose a Category and a Language.
- Click the + button and select the widget you want to add. (1)
- Once the widget appears on the screen, click on it to adjust settings or add necessary text. (2)
- Add mail merge fields to display the actual patient data in the form. (3)
- Repeat steps 4–6 until the template is complete.
- Click Save.
- The new form template will then appear in the list on the left-hand panel.

¶ How to edit a form template
- Open the Admin section and go to Documents, Forms and Templates.
- Click Form templates.
- Expand the list and select the form you want to edit.
- Make the necessary changes.
- Click Save.
¶ How to delete a form template
- Open the Admin section and go to Documents, Forms and Templates.
- Click Form templates.
- Expand the list and select the form you want to edit.
- Click Delete.
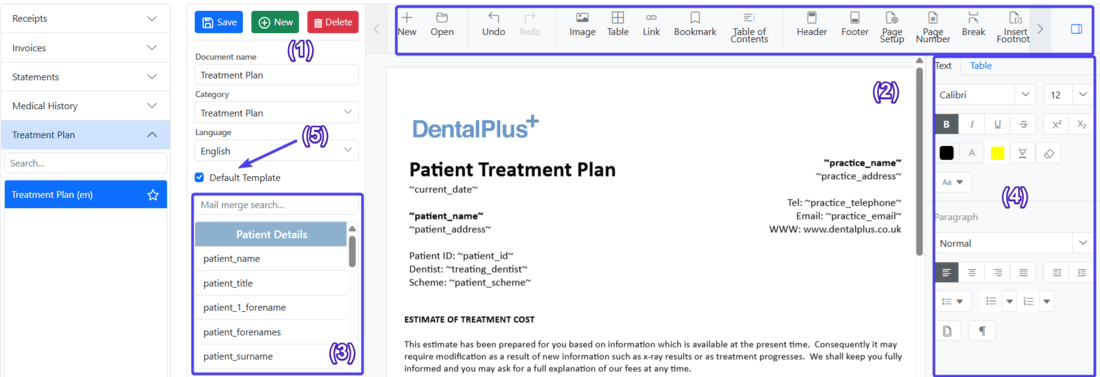
¶ System Templates
This section contains templates used by DentalPlus for internal processes and tasks.
¶ How to add a system template
- Open the Admin section and navigate to the Documents, Forms and Templates section. Click System templates.
- Click + New. (1)
- Enter a document name.
- Choose a Category and a Language.
- Create a template in the editor area. (2)
- Use mail merge fields to insert patient-specific data automatically. (3)
- Format the content as needed by changing font styles, structuring text with paragraphs, and adding tables, lists, images or clickable links. (4)
- Set it as the default if required (5)
- Click Save.
- The new system template will then appear in the list on the left-hand panel.
¶ How to edit a system template
- Open the Admin section and go to Documents, Forms and Templates.
- Click System templates.
- Expand the list and select a template you want to edit.
- Make the necessary changes.
- Click Save.
¶ How to delete a system template
- Open the Admin section and go to Documents, Forms and Templates.
- Click System templates.
- Expand the list and select a template you want to edit. If the selected template is set as the default, the system will display a warning to let you know before you make any changes.
- Click Delete.
¶ Practice Financials
The Cashup feature within the Admin → Financials section lets you record and summarise all payments taken in a day, broken down by payment methods such as card, cash, cheque, direct debit, practice account, and float. You refresh and save at the end of the day to complete the cash-up and generate a printable summary of takings.
The Adjust Float function lets you set the amount of cash (float) you want available for the next working day and record why it changed; you can also reset the float to zero if needed. Together, these tools help practices accurately reconcile daily payments, manage their working cash balance, and maintain clear financial records for reporting and auditing.
.png)