¶ Waiting Room
When a patient arrives at the practice for their appointment, you can book them into the Waiting Room.
- In the Appointments book, right-click on the patient’s appointment to produce a menu
- Click ‘Waiting room’
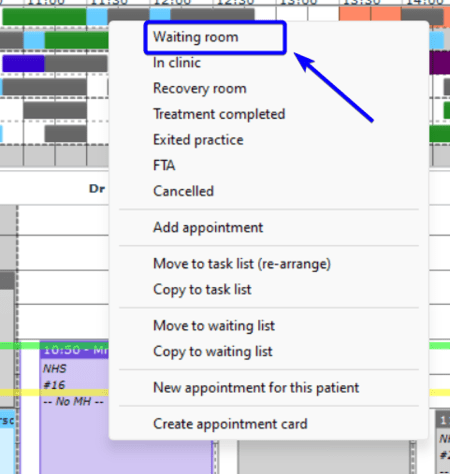
- The appointment will change colour according to Legend settings.
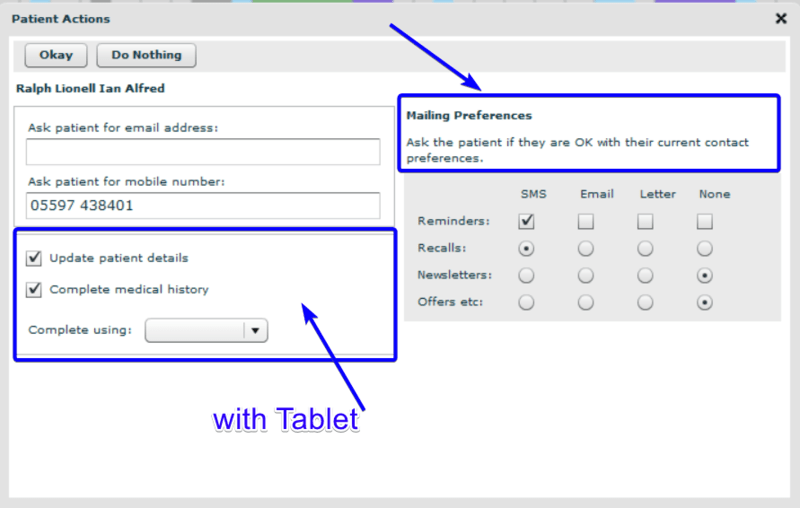
- A ‘Patient Actions’ screen will pop up to remind the receptionist to update the patient's details and mailing preferences. This can be done in person or using a tablet. These settings go to the patient details. Most of the time, mailing preferences should be confirmed with the patient. It is a requirement of GDPR (General Data Protection Regulation) to obtain formal consent from patients in order to send them various notifications and offers.
- The patient can update details and complete the medical history form using a tablet.
- After clicking Okey or Do Nothing,.
- The patient's name will appear on the DentalPlus toolbar in the waiting area.
.png)
- Once all of the forms and required paperwork have been completed, the patient will be invited into the surgery
Clinician Waiting View
If you log in as a Clinician, you will only see your patients. If you or the patient is running late, the patient's name will be highlighted in red.

Administration Waiting View
If the user is logged in as Admin, you will see the names of the clinicians, followed by the number of patients waiting.

¶ In clinic
- When the patients enter the surgery, the receptionist or dentist marks them as ‘ In clinic’, causing the appointment status to change to green.
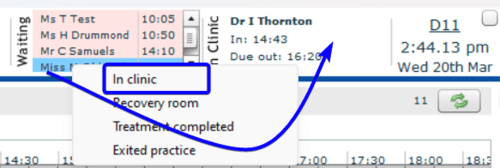
- Do right-click on the appointment in the appointment book and select ‘In clinic’ in the context menu.
- For clinical roles, you can right-click on the patient in the toolbar ‘Watying’ area . it will produce a menu with ‘ In Clinic’ option. The patient will move from the “Waiting” box to the “In Clinic” box.
Double left-click on the patient’s name in the “In Clinic” box to enter their Patient Record.
- The patient name will appear on the DentalPlus toolbar in ‘In Clinic’ area
- This status indicates that the patient is seeing a clinician.
When an appointment is completed, the clinician sends 'Pass to Reception' tasks. The receptionist finishes the essential tasks before the patient departs the surgery. These responsibilities could involve paying, scheduling the next session, or gathering additional information. The receptionist should click on each tab and finish all of the chores before the patient leaves.
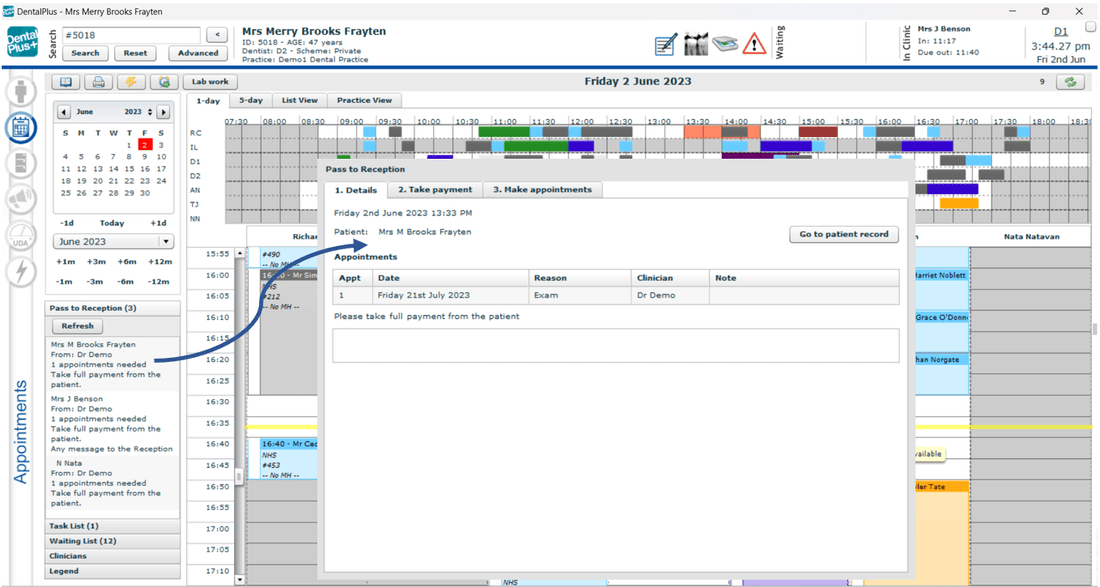
***. All tasks must be completed before the patient leaves the practice.
¶ Exited Practice
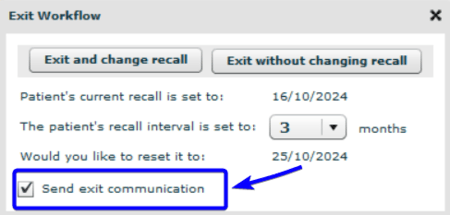
When the appointment is over and a patient is ready to leave the clinic, the appointment status changes to ‘ Exited’ by clicking on the appointment and selecting ‘Exited Practice’ in the context menu. A box will pop up to remind the receptionist to update the Recall interval or send Exit communication

Here, you can do two things:
- Exit and change recall. To change the patient's recall interval, a single left click on “The patient’s recall interval is set to” and a single left click on the required months.
- Exit without changing recall by clicking “Exit without changing recall”.
- Sending Exit communication. You can send a patient an automatic "Exit communication" that may include a survey or a link to a review.
- Right-click on the appointment and select ‘ Exited Practice’
- Tick ‘Send exit communication’
3. The system will send an email or SMS using a preset template for this type of communication.
You can check and choose a document template in the Admin→System Setup→Auto Comms→ Exit comms. Simply select templates from drop-down menus and click ‘Save’.
You can configure both email and SMS documents, and a patient will only get emails if their email address is entered in the Patient information. SMS will be sent if only the mobile phone number is in the patient's details.

You can create an ‘Exit comms’ template in the Admin→Documents
Click ‘New document’
Tick ‘Email’ or ‘SMS’ in the ‘Documents use’ field.
Add the document name and text.
As an example:
Dear ~patient_name~.
Thank you for attending your dental appointment ~previous_appointment~ at ~practice_name~
Could you please complete the Patient feedback survey by following this link : please click here
Thank you once again for choosing ~practice_name~
Kind regards, Recepion Team
~practice_name~
Don't forget to include an external link to the survey in Google Forms, review in Google Maps or your website, etc. You can find a help article about creating clickable links in the templates.
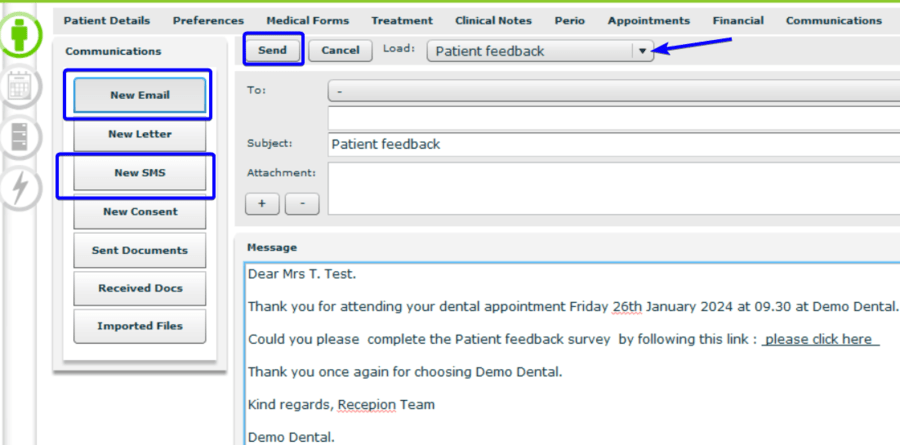
4. All sent communications are saved in the Patient Record → Communications → Sent Documents. Here you may find information about this communication, such as the date and time it was sent. Double-click the description to see the text.
.png)
5. ‘Exit communication’ can be sent manually from the Patient Record → Communications
Click on the ‘New Email’ or ‘New SMS’
Choose the appropriate template from the ‘Load’ dropdown and click ‘Send’
¶ Other statuses
'Treatment completed' and ‘ Recovery room’ are appointment statuses if the patient had sedation or other treatments and was transported somewhere to recover.
The FTA status "Failed to Attend" indicates that the patient planned an appointment but failed to arrive without providing prior notification or cancelling the appointment.
¶ Reset patient status
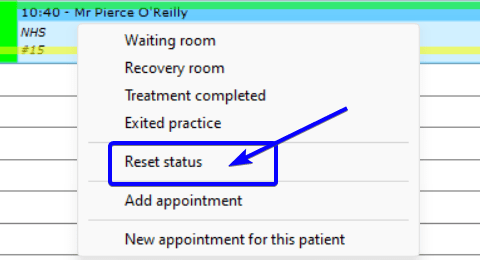
The Appointment Book allows you to reset the patient's status.
- single right-click on the appointment that requires the reset.
- a menu will appear.
- click on “Reset status”.
¶ Useful reports
Appointments at status report
A report shows the patient's appointment details. It has different settings and can be filtered by date, choosing relevant clinicians, schemes, statuses, and appointment reasons.
Location: Admin → Reports→ Appointments→ Appointment at status
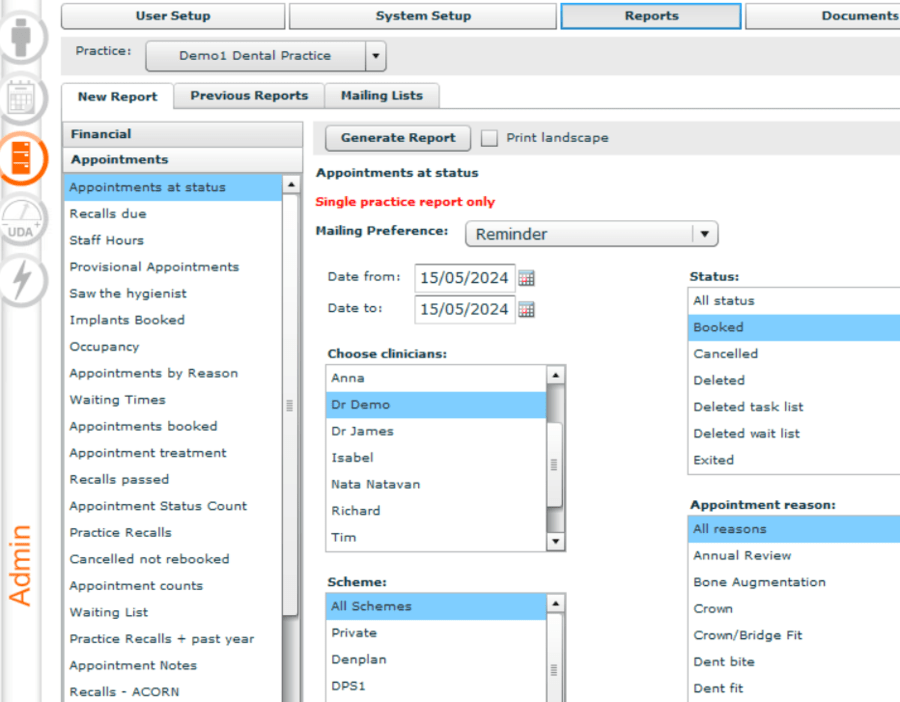
To process the report enter the relevant details:
1) Select Date from / Date to

2) Choose a particular clinician, group, or all by a single left click on the clinicians required. The selected clinicians will be highlighted in blue in the list. To select multiple clinicians, single left click the first clinician name, hold down the “CTRL” key on the keyboard and single left click on the other clinician names required.

3) Choose Scheme. This report can be created for all, multiple or individual schemes. After clicking the selected schemes will be highlighted in blue in the list. To select multiple schemes, single left click the first scheme, hold down the “CTRL” key on the keyboard and single left click on the other schemes required.

4) Status can be selected as all, multiple, or individual status.

5) Appointment Reason. This report can be created for all, multiple or individual appointment reasons.

When all details are complete, single left-click on “Generate report”. The report results box will appear.

Single left click “Print List” to display the report , print or save

Waiting times report
Broken down per clinician, the report shows an average waiting time for each clinician, with further detail of each patient showing when they arrived, time they went in clinic, time waited, time exited and total time in the practice.
Location: Admin → Reports→ Appointments→ Waiting times
This report requires only the date parameters to be filled out. Once the fields are completed, simply click on 'Generate Report'.

The report results box will appear.

Click on “Print List” to produce the report , print or save
